Best Slide Transitions And Animations For Business Presentations

Quick Summary
Transitions vs. Animations: The Difference in One Table
The core difference in PowerPoint and animation workflows comes down to scope: PowerPoint transitions animate full-screen shifts when moving between consecutive slides, whereas a PowerPoint animation effect controls individual elements (such as text boxes, charts, shapes, or icons) on a single canvas. Learning how to add animation to PowerPoint slides alongside subtle slide shifts forms the foundation of clean, professional presentation techniques.
While a single transition controls overall slide shift, you can stack multiple entrance, emphasis, or exit PowerPoint animations onto individual visual objects across a single canvas. For executive business decks, keep transition durations under two seconds and rely primarily on subtle presentation techniques, such as Fade, Appear, or Wipe, to maintain pacing without overwhelming your audience.
Where to Find Transition Effects?
- PowerPoint
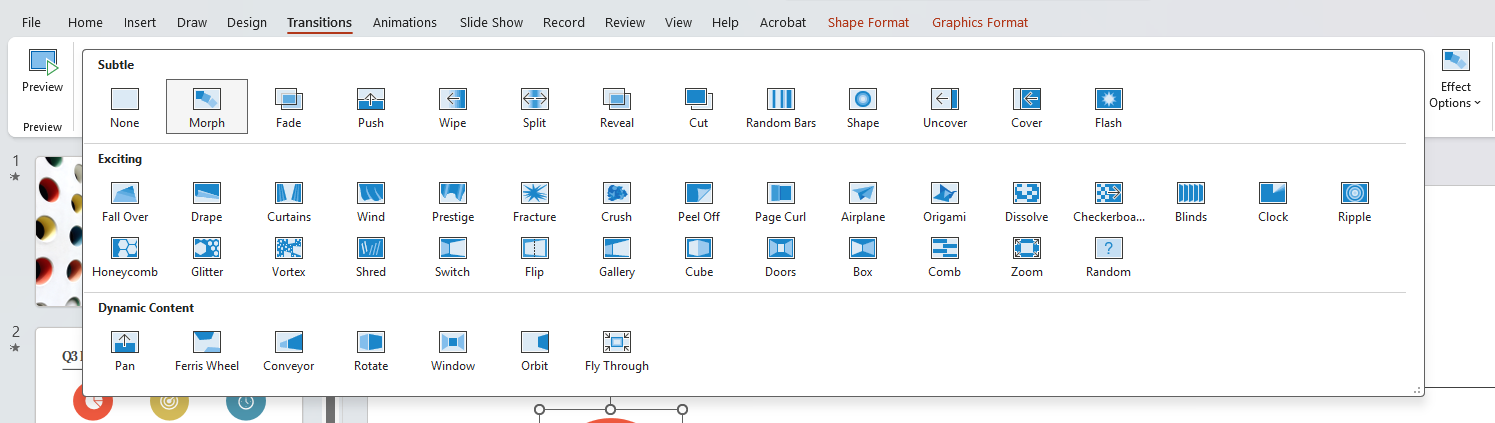
Look for the Transitions tab in the toolbar. As you can see, transitions are categorized into three: Subtle, Exciting, and Dynamic. Click on the effect you want to use, and you’ll get a quick preview of how it looks on your slide.
- Google Slides
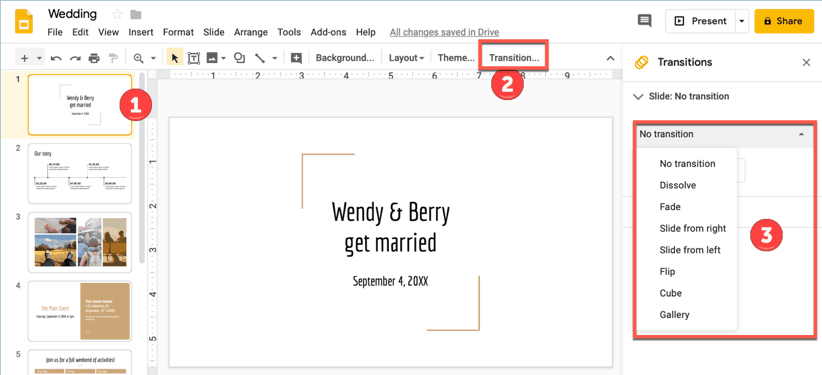
If you’re a Google Slides user, you’ll find your transition effects by first clicking on a slide in the navigation pane (step 1). Then look for the Transition button in the menu bar (step 2). The Transitions pane will appear on the right. Choose from the 7 different transition options (step 3) as you see below:
Where to Find Animation Effects?
- PowerPoint
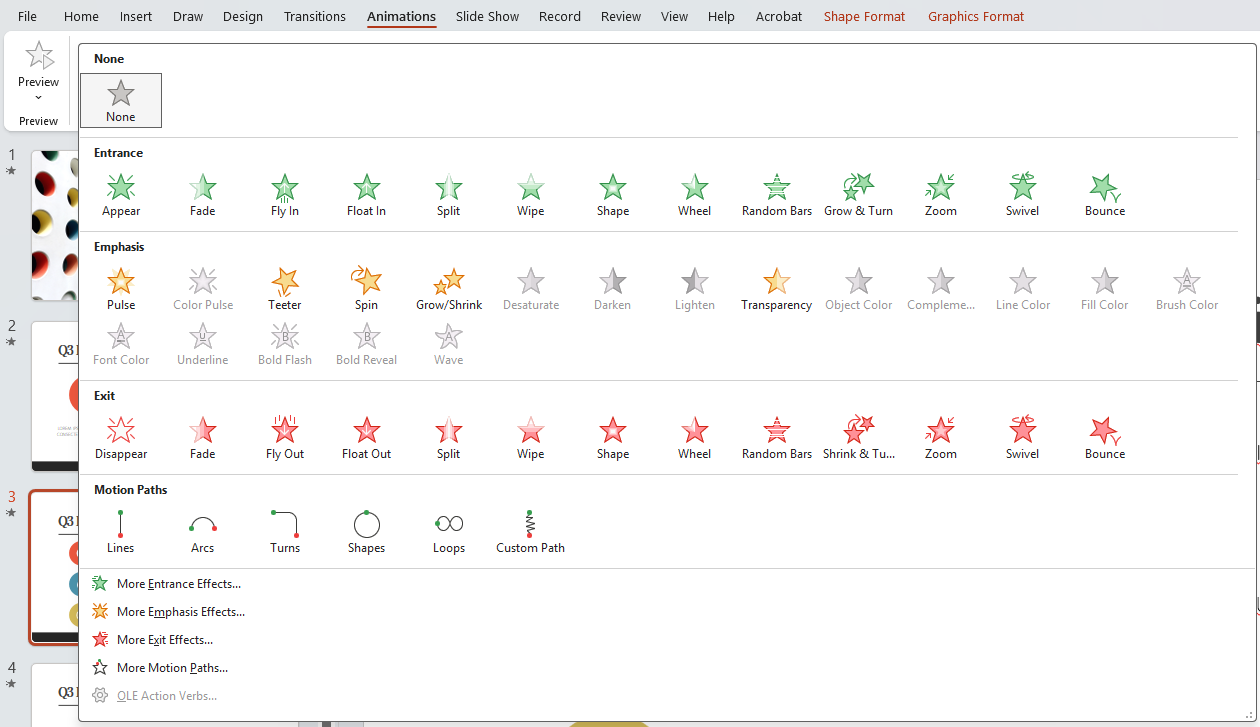
This is what the Animations tab looks like in PowerPoint. It’s categorized into Entrance, Emphasis, Exit (not shown), and Motion Paths (not shown). If you want to view the complete list of animations, then check out the extra options inside the red box below.
- Google Slides
In Google Slides, you would also need to click first on the object you want to animate. Right-click and select Animate to access the Transitions side panel. Then click on Add Animation as you see below:
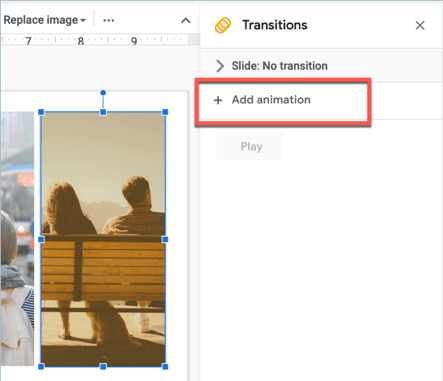
Just like the Transition effects, you only have a limited number of object animation options in Google Slides (13 to be exact).
Morph Transition for Business Presentations
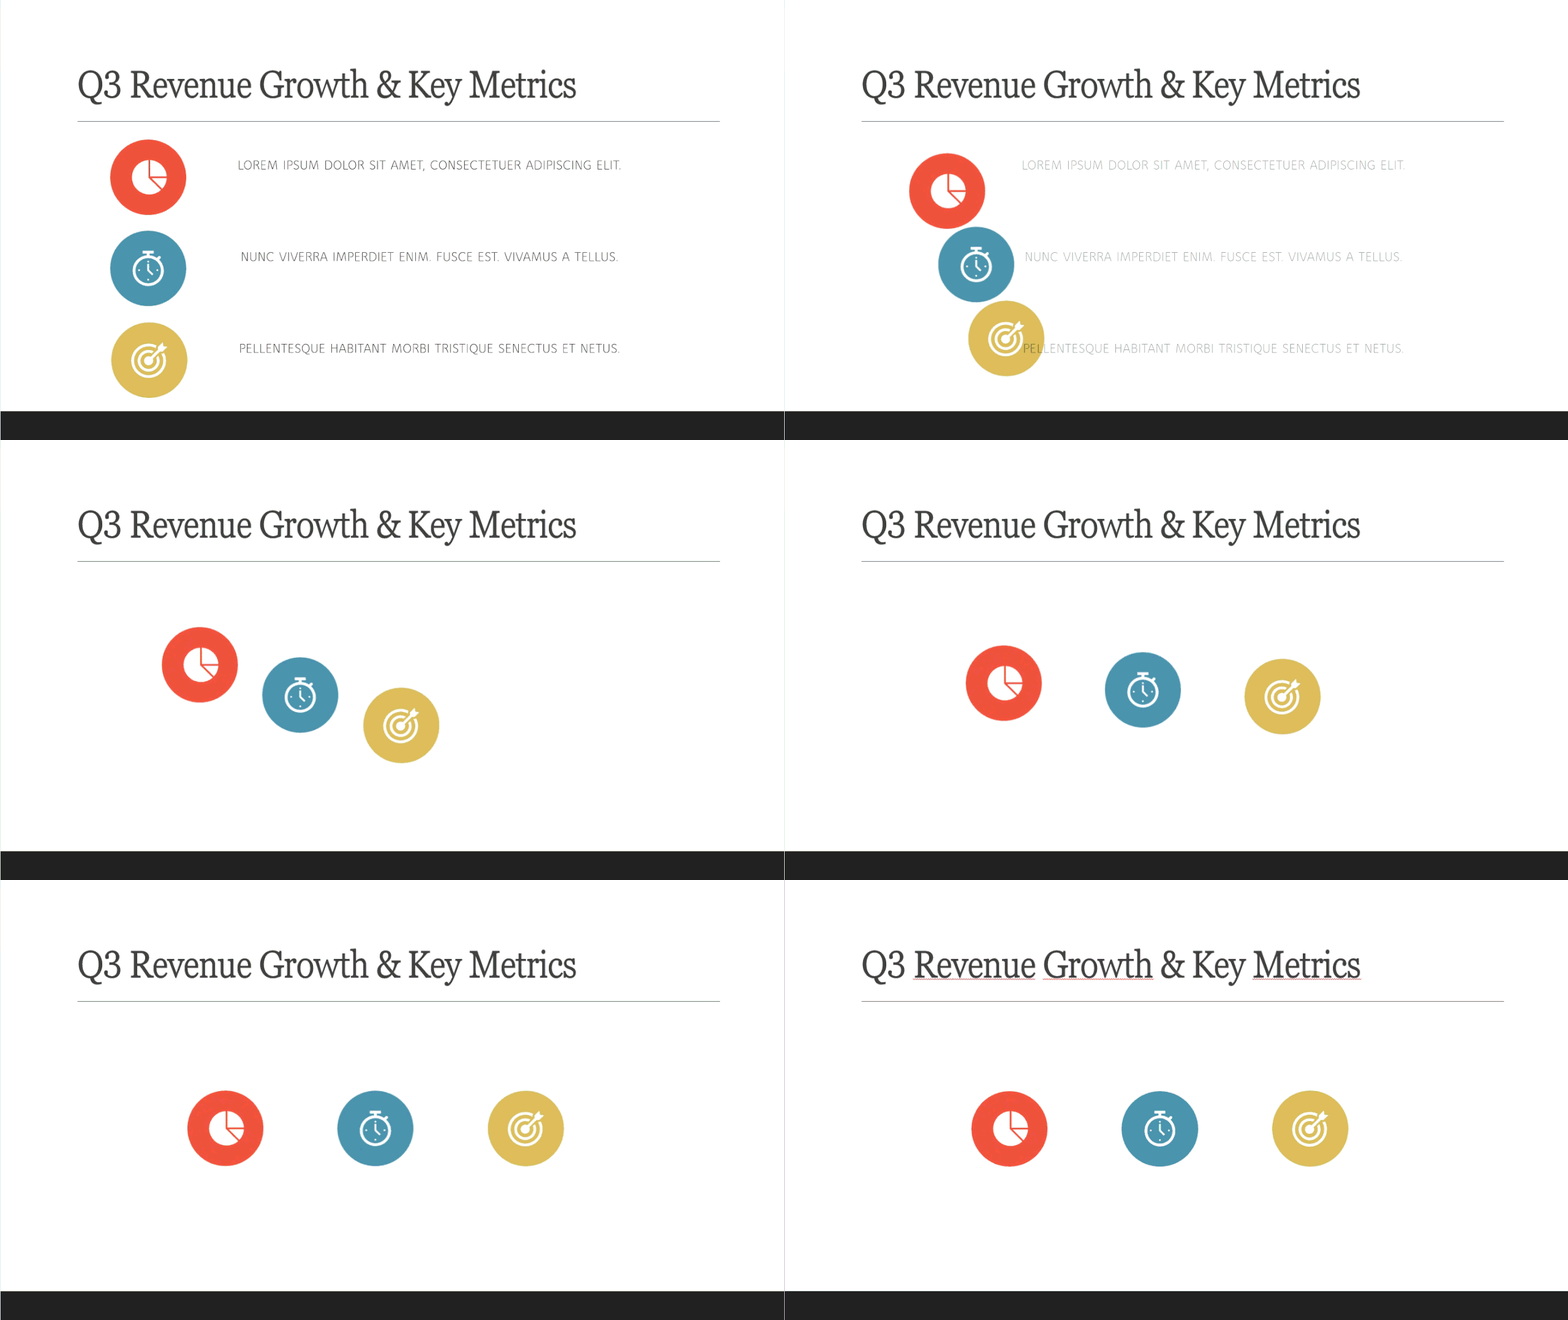
The Morph slide transition creates smooth, fluid visual movements by automatically tracking and animating identical objects across consecutive frames. Unlike standard object-level PowerPoint animations, Morph transforms static slide changes into seamless motion design, making data shifts look custom-built.
System Requirements
Morph is a native feature built directly into Microsoft 365, PowerPoint 2019, and PowerPoint for the Web. Because it is standard in modern Office suites, you do not need any external PowerPoint morph transition download or third-party add-ins. Note: Morph is unsupported for creation or editing in PowerPoint 2016 and older desktop versions.
Concrete Business Use Cases
- Org-Chart Reshuffles: Demonstrate team restructuring or reporting hierarchy changes smoothly without jarring jump-cuts.
- Bar Chart Value Changes: Expand data bars or shift financial metrics from Q3 to Q4 to visually emphasize revenue growth.
- Product Detail Zoom: Seamlessly transition from a full-product lineup on Slide 1 to a zoomed-in, high-detail feature callout on Slide 2.
The 3-Step Setup Rule: Mastering how to add transitions to PowerPoint using Morph requires a simple two-slide setup:
- Create Base Slide: Build Slide 1 with your initial layout (e.g., baseline bar chart or original org chart layout).
- Duplicate & Modify: Right-click Slide 1 and select Duplicate Slide. On Slide 2, move, resize, recolor, or reposition the target objects to their new positions.
- Apply Morph: Select Slide 2, navigate to the Transitions tab on the ribbon, and click Morph.
Executing this PowerPoint transition elevates high-stakes executive presentation techniques, adding cinematic polish to your decks in seconds without complex video editing.
Transition and Animation Types Compared
Selecting the right slide transition or PowerPoint animation effect depends on your visual goal, audience context, and presentation pace. Applying subtle movements keeps executive stakeholders focused on your narrative rather than distracting effects.
Strategic Duration and Timing Rules
Matching effect categories to their recommended durations prevents visual drag during live speeches. When evaluating animation and transition settings in your deck, apply these three core principles:
- Keep Entrance Effects Brief: Set entrance PowerPoint animations like Appear or Fade to under 0.50 seconds so text populates instantly as you speak.
- Standardize Slide Movement: Use one primary slide transition (such as Fade or Push) across all core slides to maintain deck consistency.
- Limit Motion Paths: Reserve motion path animations exclusively for demonstrating complex physical movements or data flows to prevent visual clutter.
Category Overview Comparison
Why Use Animations and Transitions in Your Presentation?
Here are a few good reasons why you should consider adding animations and transitions to your PowerPoint (and Keynote / Google Slides) presentations:
- Enhance your presentation’s appearance
You don’t need to add any effects to your presentation. But I promise you that if you use the right animation and transition effects, you can transform the appearance of your entire presentation. From boring to fun and even dramatic, it’s all possible with animations and transitions.
- Emphasize key points
This is especially easy to do with object animation. For example, if you’re presenting a numbered list or some bullet points, you can set each point to appear one after the other. This means you get some time to discuss each point without your audience reading ahead to the next items on your list.
- Control the pace
When you show everything at once on the screen, then it’s a given that everyone will know what you’re about to say. However, with animations, you can control the pace of your presentation. You can build up some ‘drama.’ When the time comes for the big ‘reveal,’ use the right animation to achieve your desired effect!
- Grab people’s attention
Animations and slide transitions are useful in grabbing people’s attention. Even if your audience isn’t looking directly at the screen, any slight movement on your slides can get them to look at your slides again. Use animations sparingly, though. You don’t want people to stop looking at your slides altogether simply because they literally felt sick from watching your animations!
Best Practices: When Transitions and Animations Help vs. Hurt
You’ve probably heard of “death by PowerPoint” by now. Well, do you know its cousin, “motion sickness by PowerPoint”? If you’ve ever sat on a presentation that used tons of transitions and animations, and found yourself a bit dizzy after, then you’ve experienced motion sickness.
I’m sure you don’t want to subject your audience to this unpleasant feeling. For best results, follow these practices when adding various animations to your slides:
- Keep it simple
Yes, there are tons of fancy animation options in PowerPoint, but it doesn’t mean you need to use most, or all, of them in your presentation. Can you imagine how your audience is going to react when they see you’ve added an animation effect to every single element on each slide? It would be a disaster, I can assure you.
Let’s say you’ve got 10-20 elements (text, images, icons, shapes, etc.) on each slide. And you add entry, emphasis, and exit animation effects to each element. This translates to at least 30 animations on just a single slide! If I were sitting in your presentation, I’d be walking out after the first slide (yes, it’s that bad).
- Ask yourself this question: Would this animation make my presentation better?
When answering this question, try to be as objective as possible. Sure, adding fancy effects may look “cool.” But not if it’s at your audience’s expense. With that said, if your answer is “yes,” then, by all means, go ahead and add the animation. Otherwise, it’s best to forego adding that particular effect.
- Use the same transition effect for all slides
In line with the principle of keeping things simple, it’s best to use a single transition effect for all your slides. It can get confusing for your audience if you mix it up. For example, if you decide to use a simple fade transition, then consider using that for all your slides. Here’s how you do this in PowerPoint:
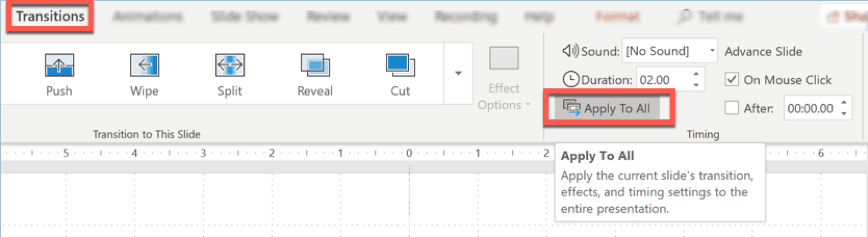
In the Transition pane, choose the effect you want to use. Then click the Apply To All button, as you see below:
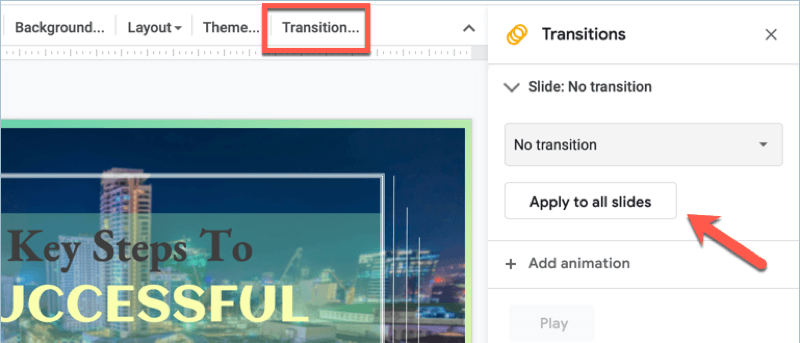
For Google Slides users, you’re in luck. Because just like PowerPoint, you can apply the same transition effect to all your slides. Simply click the Transition button to open up the Transitions pane. Then, select your preferred transition effect and click that magic Apply to all slides button. Here’s what it looks like:
- Preview the animations
Preview all the animations you’ve added and try to look at your presentation slides objectively. When you practice your speech, time the animations to coincide with what you’re saying. Or, say, for instance, make an object appear or exit with your timed pauses.
It shouldn’t take you more than a second or two to decide if an animation actually adds value to your presentation. If it distracts from the main point, then perhaps you may want to replace it with a non-headache-inducing effect. Or better yet, totally remove it from the slide.
Fine-tune your animation if you need to. At the end of the day, it’s your audience who’s going to decide if your presentation is awesome or if it’s a total bust. Remember, no one’s going to complain if you use zero animations on your slides. But trust me, you’re going to hear something negative if you use one too many!
When Motion Helps Your Presentation
- Controlling Speaker Pace: Reveal sequential bullet points or chart series one by one to prevent executive audiences from reading ahead while you deliver key insights.
- Demonstrating Process Continuity: Apply subtle transitions such as Push or Morph to cleanly connect multi-slide timelines, org-chart restructures, or progressive process workflows.
- Directing Visual Attention: Use basic emphasis effects (such as Fill Color or Font Color) to highlight specific data rows or key metrics during live discussions.
When Motion Hurts (And Technical Gotchas to Avoid)
- Outdated Audio Effects: While PowerPoint lets you attach sound effects to object movements (via Animations > Animation Pane > Effect Options > Sound), audio cues sound unpolished in corporate environments and diminish professional credibility.
- The "Apply to All" Timing Gotcha: Using the Apply to All feature in the Transitions tab ensures uniform PowerPoint transitions, but it automatically overrides any custom per-slide duration or delay settings you configured previously.
- Morph Object-Tracking Failures: Morph requires continuous object identities across consecutive frames. If you delete and re-insert an image on Slide 2 rather than duplicating the original slide canvas, Morph fails silently, falling back to a standard fade effect instead of a smooth visual transformation.
- Animation Stacking Overload: Applying entrance, emphasis, and exit animations to every element on a slide creates visual chaos and drastically slows down narrative delivery.
Teams that need every deck, board updates, sales decks, and investor materials, to look consistently on-brand without someone manually tuning transition timing on every slide often hand this work to a dedicated design team. 24Slides' designers build motion and transition consistency into the master template during onboarding, so it's set once, not re-applied deck by deck.
To maximize presentation impact, use a single, subtle slide transition consistently throughout your deck, and reserve PowerPoint animations strictly for sequencing complex data rather than for visual decoration.
Teams that need every deck, board updates, sales decks, and investor materials to look consistently on-brand without someone manually tuning transition timing on every slide often hand this work to a dedicated design team. 24Slides' designers build motion and transition consistency into the master template during onboarding, so it's set once, not re-applied deck by deck.
When to Skip Transitions and Animations Entirely
If you're presenting board financials, regulatory or compliance content, or any deck where a reviewer needs to screenshot static slides for a report, skip transitions and most animations; they add nothing to comprehension and can break when the deck is exported to PDF or presented via screen-share software that doesn't render motion smoothly. A plain, high-contrast static layout will outperform a motion-heavy one in these contexts every time.
Remove motion completely in these specific business scenarios:
- PDF & Print Exports: Converting .pptx decks to PDF strips out slide transitions and freezes overlapping entrance animations, often hiding critical data or leaving text boxes stacked incorrectly.
- Low-Bandwidth Screen Sharing: Virtual meetings over Zoom or Teams frequently lag during animated sequences, causing smooth transitions to appear as choppy, unreadable jump cuts for remote attendees.
- Executive Audits & Legal Reviews: Financial reviewers require immediate, full-page visibility of static metrics and compliance disclosures without waiting for delayed text builds.
The Top Slide Transitions and Animations for Business Presentations
The saying “less is more” holds absolutely true in all kinds of presentations. You don’t want to crowd your slides with too much information. You don’t want it to look like there are a million things going on in there.
Why? Because it distracts from your role as a speaker and presenter. You want people’s attention to be on you and what you’re saying – not on your slides. PowerPoint slides are supposed to be used as mere visual aids. They’re not the star of your presentation – YOU ARE!
With that said, below are the most commonly used transitions and animations in PowerPoint business presentations. For Keynote and Google Slides users, use animations that are similar to the effects outlined below:
Best Transition Animations in PowerPoint
- Morph – this modern favorite seamlessly animates object movements between two consecutive slides. Instead of a basic slide-swap, PowerPoint automatically tracks identical objects, shapes, or charts and smoothly morphs their position, size, or color. It’s perfect for showing bar chart metric changes, org-chart restructures, or zooming into product details without complex video editing. (Note: Available in Microsoft 365, PowerPoint 2019, and PowerPoint for the Web).
- Fade – this is an old favorite among business presenters. The previous slide will ‘fade’ away to reveal the next slide. You can choose to have the previous slide fade smoothly or have it fade through black.
- Push – this effect makes the previous slide ‘push’ the new slide into view. You can use this effect to connect related slides. For instance, if your timeline spans two slides, then you can use this effect to let your audience know the slides are connected. You can choose from 4 different effect options: push from the bottom, left, right, and top.
- Cut – this actually works like a much faster fade effect. The previous slide will disappear almost instantly, and the current slide will appear in its place.
- Cover – this is a relatively simple transition effect. The new slide will essentially cover the previous slide. You can choose to have the new slide move in from 8 different directions.
- Uncover – this is the exact opposite of the Cover effect. Instead of the new slide moving in and covering the previous slide, it’s going to be the previous slide moving out of the way to quickly reveal the new slide.
Exit Animation EffectsEntrance Animation Effects
If you don’t want your slide elements to appear all at once, then you may want to add entrance animation to some objects. You can set it to start (1) on click, (2) with the previous animation, or (3) after the previous animation. You can also set how long you want the animation to last (duration) or even apply a delay to your animation.
Go to Animations > More Entrance Effects for a complete list of effects in this category. Here’s a screenshot of all available entrance effects in PowerPoint:
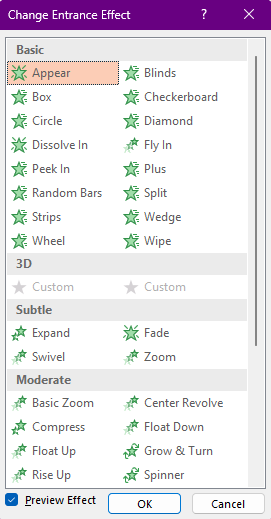
Appear, Fade, and Wipe entrance animation effects are great (and simple) options if you want to animate something in your business slides.
Emphasis Animation Effects
One of the best ways to draw attention to a specific object on your slide is to use an emphasis animation effect. These effects can only be applied to objects that are already on the slide. So, if you’ve applied entrance animation to the same object, then the emphasis effect is going to happen AFTER it’s made an entry and is already on the slide. Also, objects with emphasis effect aren’t going to disappear from your slide (that’s what the exit animation effect is for).
Go to Animations > More Emphasis Effects for a complete list of effects in this category. Here’s a screenshot of all options:
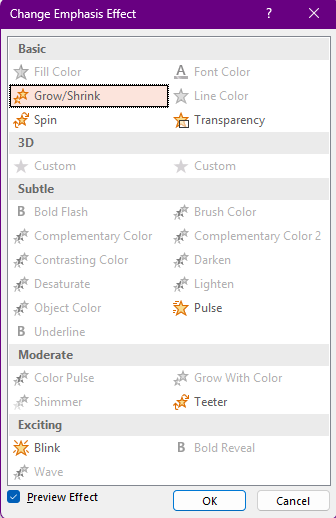
Note that not all emphasis effects are going to be available for all kinds of elements. For example, if you want to animate an image, options like Font Color, Bold Flash, Brush Color, etc., will be greyed out and unclickable. If you want to animate a certain shape, Shimmer, Underline, Grow With Color, etc., they won't be available.
For most business presentations, go over the available Basic and Subtle emphasis effects first (but skip the Grow/Shrink and Spin options). Remember, you want to add value to your presentation, not give your audience a headache!
Exit Animation Effects
Exit animations are used if you want an element to disappear from your slide. This is especially helpful if you’re trying to convey a point where a specific element is no longer needed.
Go to Animations > More Exit Effects for a complete list of available effects in PowerPoint. Here’s what it looks like:
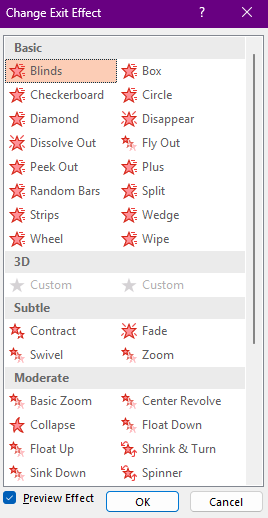
For business presentations, the best exit animations are Disappear, Dissolve Out, Wipe, Fade, Float Down, and Float Up. The objects will exit the slide but won’t cause visual anxiety for your audience.
Motion Path Animation Effects
PowerPoint may not be known as animation software. But if you know how to use motion path animation, then you can easily take your presentation to the next level. You can use it to tell effective stories and demonstrate certain points in your presentation. If you want to learn more about how motion path animation works and how to use it to make your presentation stand out, I recommend reading this article.
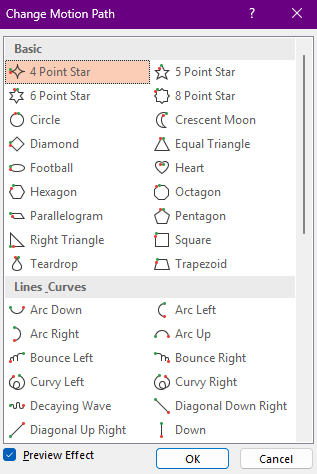
For a complete list of motion path effects, go to Animations > More Motion Paths. Here’s a screenshot:
Adding Sound Effects to Animations
Sound effects may not be necessary for most business presentations. But in cases where you absolutely need to add some sound effects to your slide animations, then here’s how:
1. Click on the element you want to animate
2. Go to the Animations tab and choose your animation
3. Click on Animation Pane (still in the Animations tab)
4. In the Animation Pane, click on the animation you want to add the sound effect to. A small triangle will appear on the right. Click on this triangle to reveal more options. Then click on Effect Options.
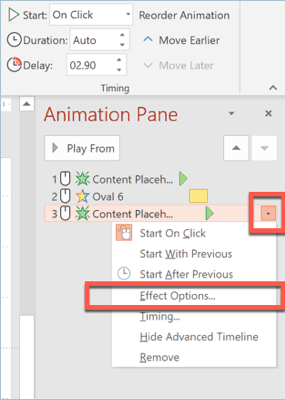
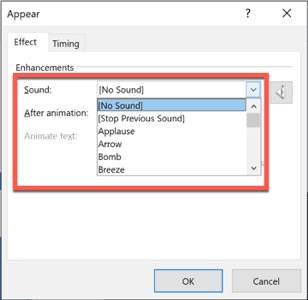
5. In the Effect tab, click on Sound and choose from the available options. Then click OK.

FAQ: PowerPoint Transitions and Animations
Q: How to add transitions to PowerPoint?
Select your target slide, open the Transitions tab on the ribbon, and choose a slide transition like Fade or Push. Adjust the movement duration in the Timing panel and click Apply to All to apply a uniform transition across your entire presentation deck.
Q: What is the difference between transition and animation?
A PowerPoint transition animates full-screen shifts when moving between consecutive slides, whereas a PowerPoint animation controls individual elements, such as text boxes, charts, or shapes, on a single slide canvas.
Q: How to add animation to PowerPoint?
Select an object, opening the Animations tab, and picking an entrance PowerPoint animation like Appear, Fade, or Wipe. Set the start trigger to "On Click" to reveal bullet points sequentially as you speak.
Q: How do I get Google Slides to transition automatically?
Click Transition in the top toolbar to open the side panel, pick a slide shift, and click Apply to all slides. When presenting, click the 3-dot icon in the control bar and adjust auto-advance timer intervals.

Q: What version of PowerPoint is needed for Morph transitions?
The Morph slide transition requires Microsoft 365, PowerPoint 2019, or PowerPoint for the Web. Morph is unsupported for creating or editing slides in PowerPoint 2016 or earlier desktop editions. On legacy versions, Morph defaults automatically to a standard Fade PowerPoint transition.
Getting Transitions and Animations Right Without Doing It Yourself
Mastering presentation motion comes down to three basic principles: PowerPoint transitions animate smooth shifts between consecutive slides, PowerPoint animations reveal individual elements within a single canvas, and native features like Morph require PowerPoint 2019 or Microsoft 365. Applied strategically, subtle presentation techniques maintain narrative pacing, direct audience focus, and elevate executive decks without creating visual distraction.
If tuning duration settings, trigger sequences, and custom slide timings across dozens of frames takes too much time away from mastering your talk track, let professional presentation designers handle the execution. 24Slides' dedicated designers apply consistent transitions and animation timing across every slide in a deck as part of the standard design process, delivered within 24 hours on standard turnaround, without the deck's motion breaking on export or screen-share.