How to Make a Picture Transparent in PowerPoint

Quick Answer: 3 Ways to Make a Picture Transparent
To quickly make a picture transparent in PowerPoint, select your image, head to the Picture Format tab on the top ribbon, and click the Transparency icon inside the Adjust group. This opens a preset gallery and a custom slider panel so you can adjust opacity in seconds.
Depending on your software version and image type, pick the method that matches your workflow:
- Transparency Slider (Best Overall): Fades an entire graphic or photo smoothly on supported modern builds (Microsoft 365, PowerPoint 2021, and PowerPoint 2024).
- Shape-Fill Trick (Legacy Workaround): Fills a shape with your photo to make a picture translucent in PowerPoint if you are on PowerPoint 2019, 2016, or older builds.
- Set Transparent Color (Flat Backgrounds Only): Uses a quick dropper tool under Color settings to erase a single solid backdrop color.

Method 1: Fade a Whole Picture with the Transparency Slider
If you are using a modern desktop build, specifically Microsoft 365, PowerPoint 2021, or PowerPoint 2024, learning how to make an image transparent in PowerPoint takes just a few quick clicks. Microsoft’s native ribbon controls allow you to adjust the overall opacity of any graphic or photo directly on your slide canvas.
Version Note: If you are running PowerPoint 2019, 2016, or an older build, your toolbar will not feature this built-in slider. Jump straight down to Method 2: The Shape-Fill Trick to use the legacy shape workaround instead.
Follow these four steps to fade your graphics smoothly:
Step 1: Select the Image on Your Slide
Click directly on the graphic or photo on your slide canvas to highlight it. Selecting the image triggers PowerPoint's contextual tools so the application knows which asset you want to modify.
Step 2: Open the Picture Format Tab
Look at the top navigation ribbon. Once your graphic is selected, the Picture Format tab automatically appears near the end of the top menu bar. Click into this tab to reveal the full suite of image formatting controls.
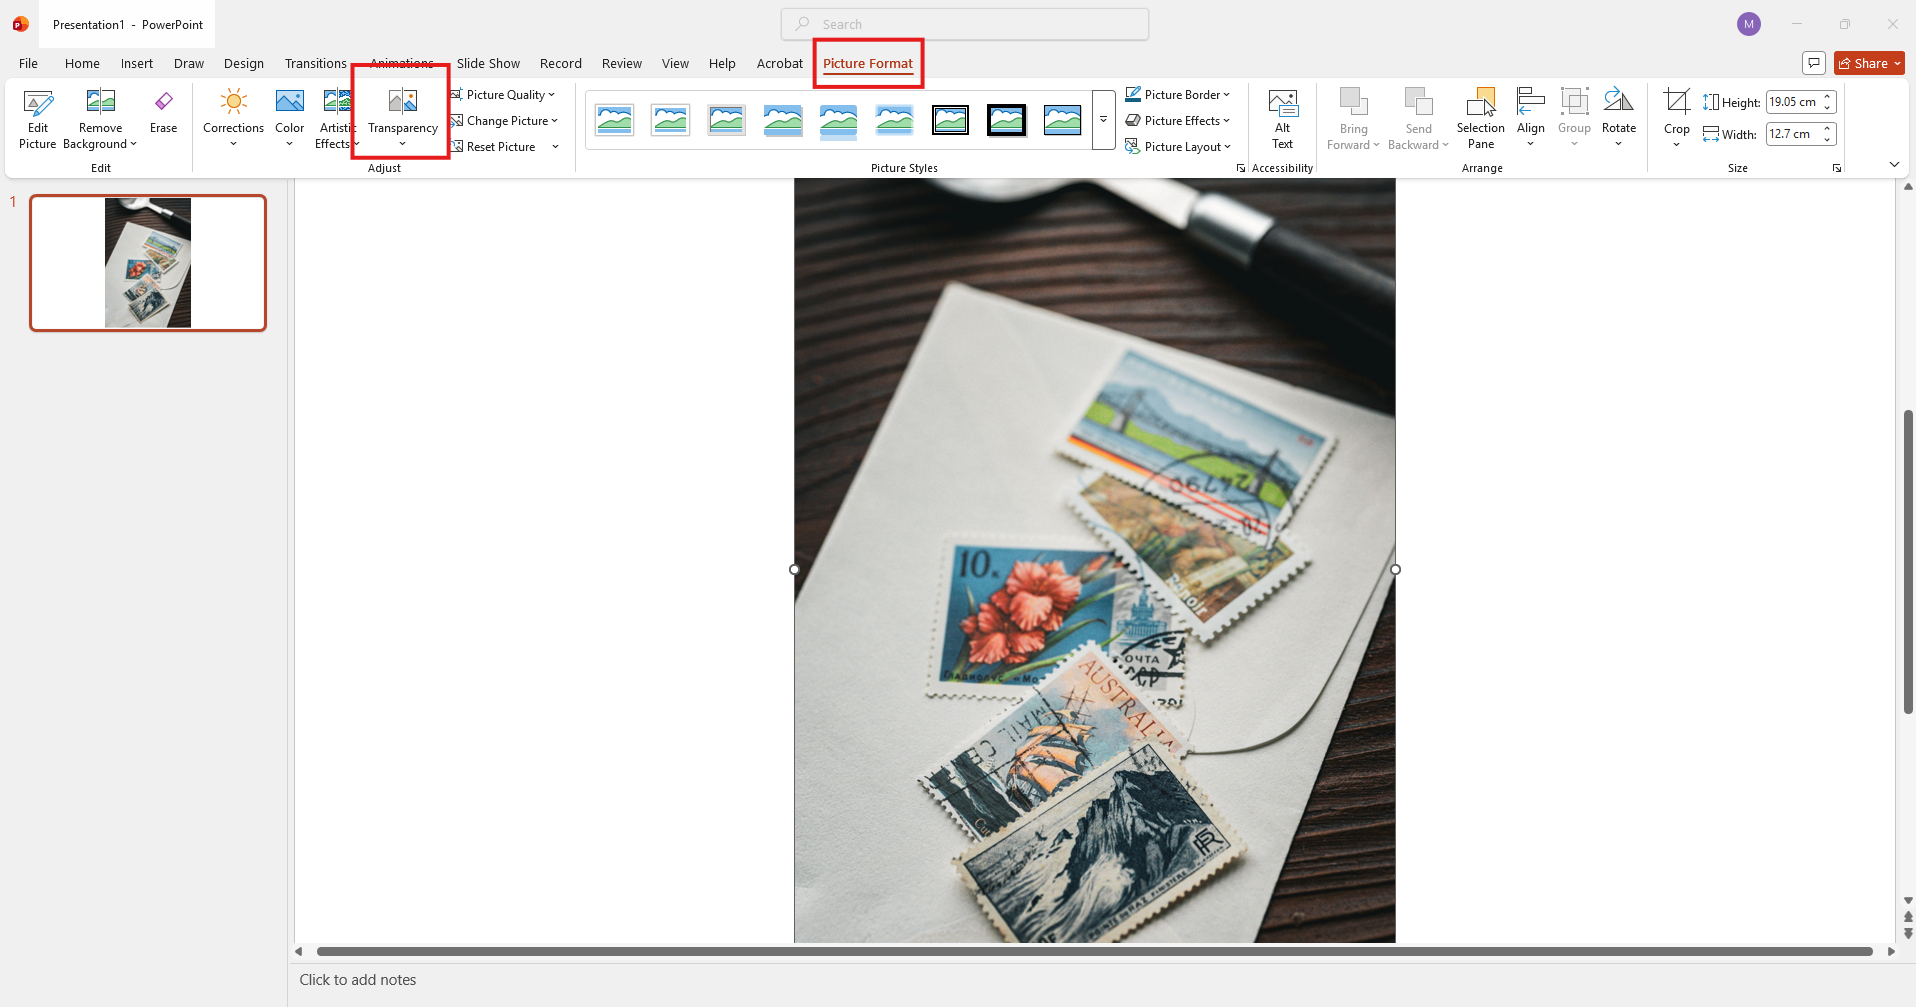
Step 3: Click Transparency in the Adjust Group
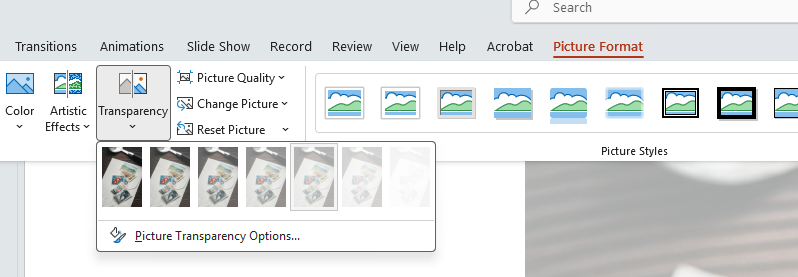
Locate the Adjust group positioned on the left side of the Picture Format toolbar. Click the Transparency icon to expand a preset gallery displaying thumbnail previews that range from 0% (fully solid) to 95% (nearly invisible).
Step 4: Choose a Preset or Open Picture Transparency Options for Fine Control
Click any preset thumbnail to apply an instant fade. For custom opacity control, click Picture Transparency Options at the bottom of the preset gallery.
This action opens the Format Picture side panel along the right side of your screen. Under the Picture Transparency section, use your mouse to drag the Transparency slider anywhere along the 0%–100% scale, or type a specific numeric percentage directly into the value box. Lowering image opacity to around 50%–70% is a simple trick to make a photo transparent in PowerPoint so layered title text remains punchy and readable.
Method 2: The Shape-Fill Trick for Older PowerPoint Versions
If you are working in a legacy desktop release, such as PowerPoint 2019, 2016, or 2013, you might wonder, "Why doesn't my toolbar have a Transparency icon?" This missing button is a classic gotcha that leaves many presenters asking how do I make a picture transparent in PowerPoint when their ribbon looks different than modern tutorials.
Luckily, you do not need to upgrade your software to make a picture transparent in PowerPoint. The shape-fill workaround trick allows you to bypass ribbon limitations on older builds by inserting a vector shape first, then filling it with your image to unlock hidden fill-opacity controls.
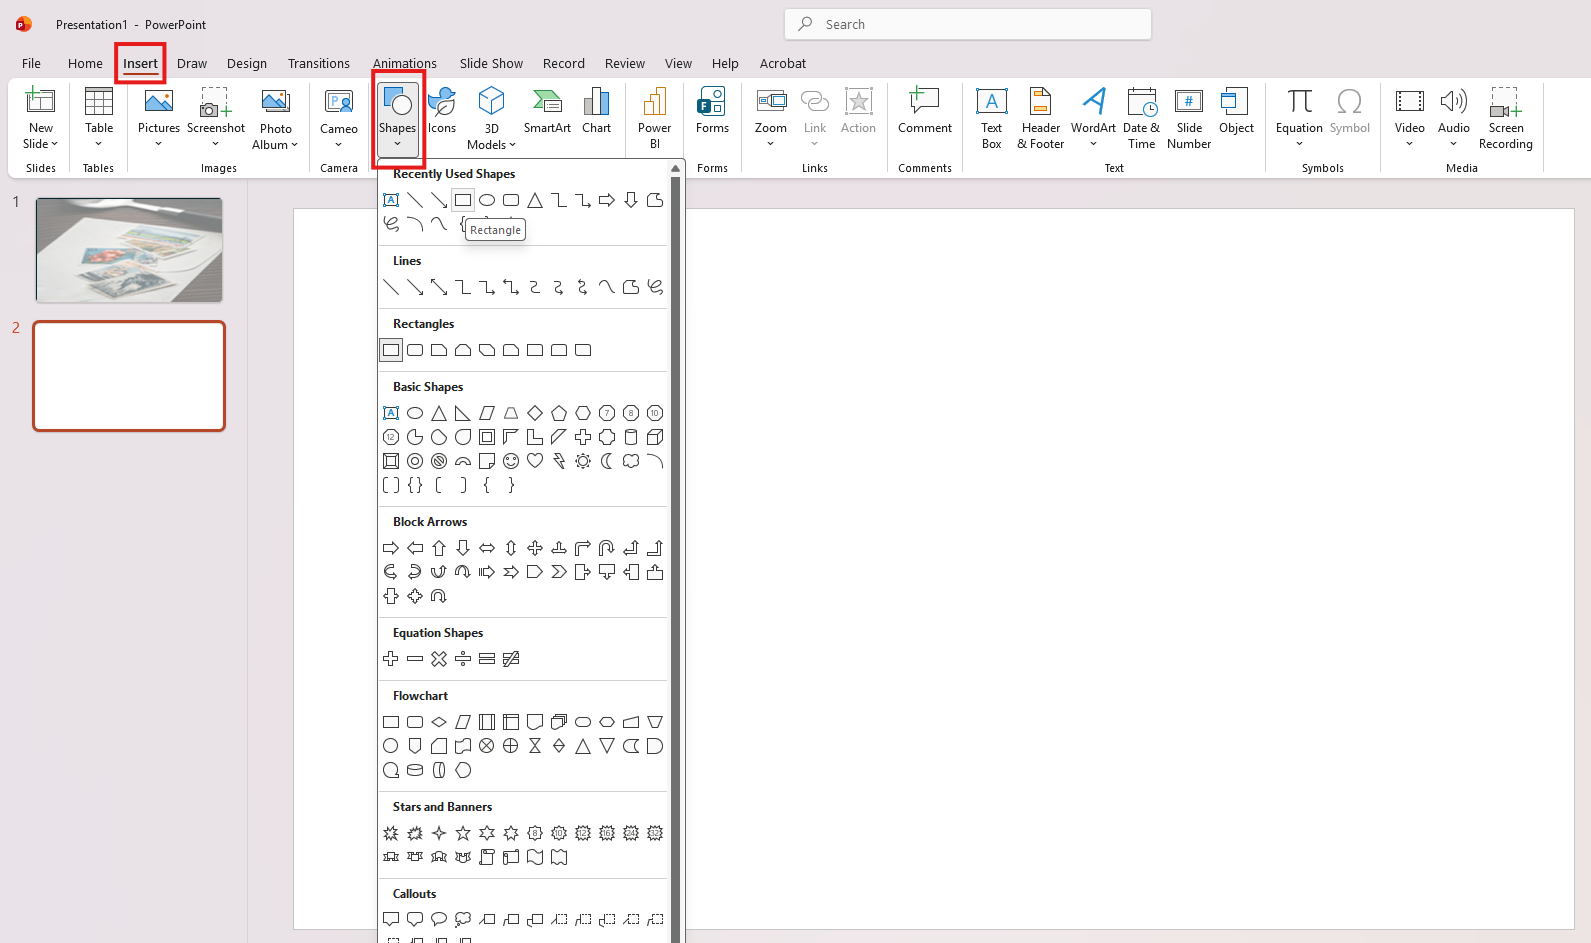
Step 1: Insert a Rectangle Over Your Slide
Go to the Insert tab, click Shapes, and choose a standard rectangle (or another shape matching your image's dimensions). Click and drag across your slide canvas to draw the shape out.
Step 2: Right-Click and Select Format Shape
Right-click your new shape and select Format Shape from the context menu. This action immediately opens the Format Shape formatting pane on the right side of your workspace.
Step 3: Set Fill to Picture or Texture Fill
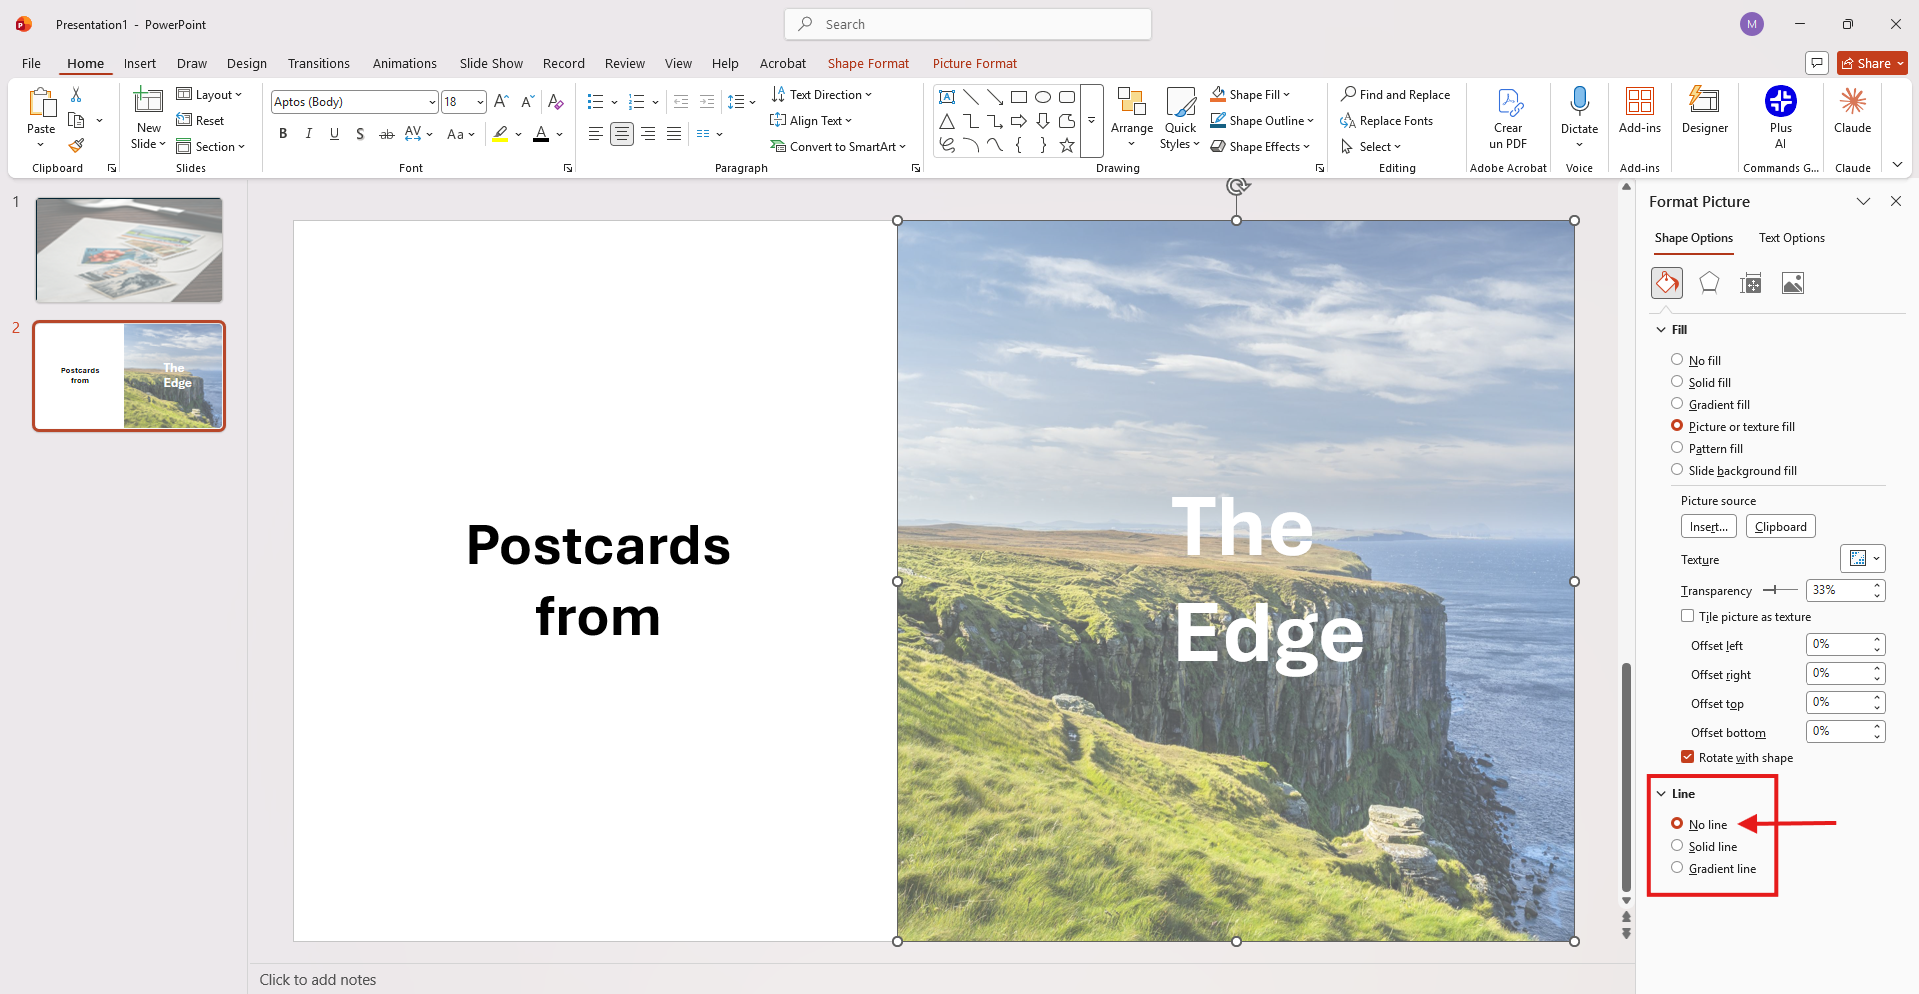
Inside the side pane under the paint bucket icon, click to expand the Fill options. Select the radio button for Picture or texture fill. Under Picture source (or "Insert picture from"), click Insert (or File) to select and upload the image from your local computer.
Step 4: Upload Your Photo and Drag the Transparency Slider
Once your photo fills the shape, look directly beneath the file upload controls inside that same Fill menu. Locate the Transparency slider. If you want to know how to make picture translucent in PowerPoint, simply drag this slider to around 40%–50% to create an elegant, background-friendly fade.
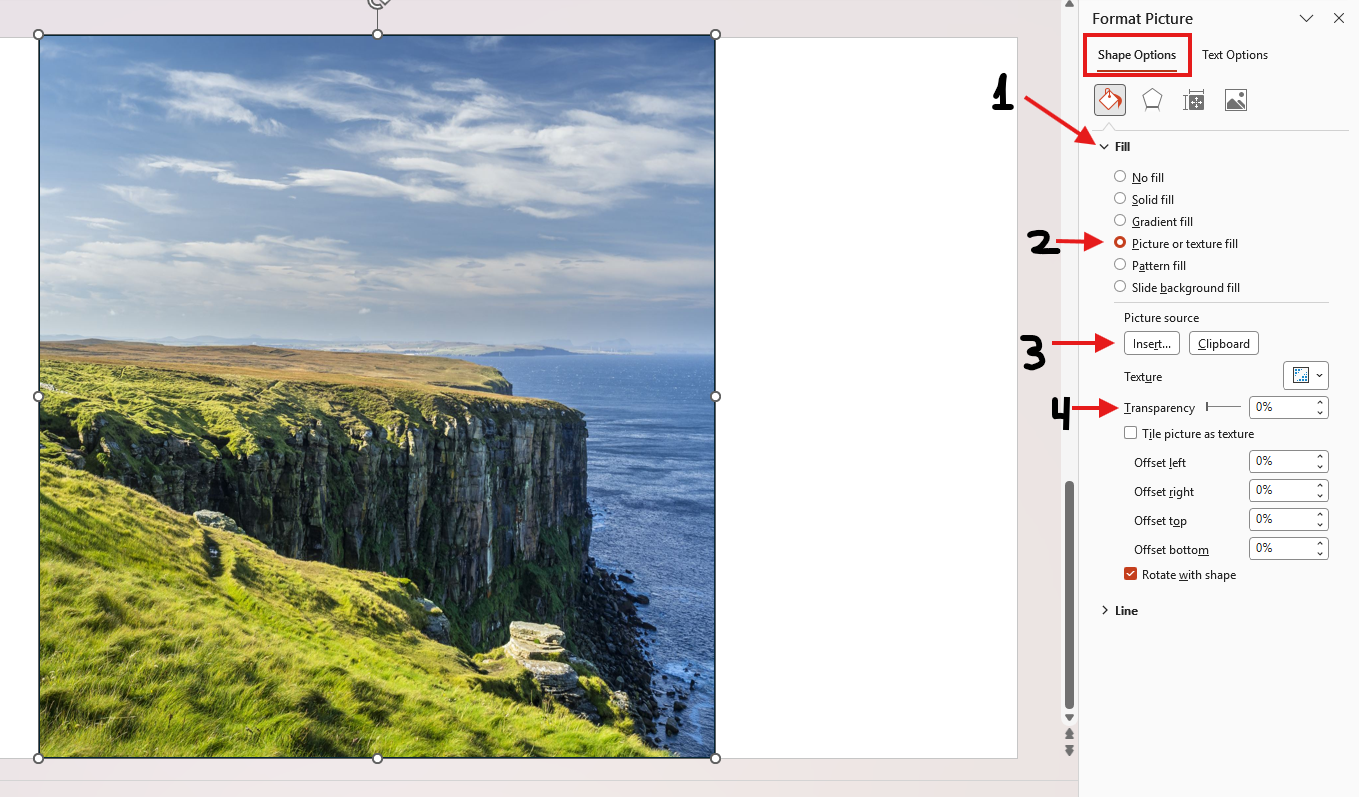
Step 5: Remove the Border with No Line
To clean up your visual, scroll down inside the same side pane to expand the Line section. Select No line to strip away the default shape outline. Knowing how to make a PowerPoint picture transparent using this method gives you total creative control over image opacity, no matter how old your Office software is!
Method 3: Remove a Solid Background Color with Set Transparent Color
Sometimes you don't want to fade an entire photograph; you just want to knock out a plain white background behind a logo or icon so it blends seamlessly into your slide canvas. If you've ever wondered how do you make a picture transparent in PowerPoint without making the main subject see-through, the built-in color-picker tool is your best friend.
This color-key technique allows you to render a single, flat background shade invisible in just a couple of clicks.
Step 1: Select the Picture
Click on the graphic or logo on your slide that has the unwanted solid background to highlight it.
Step 2: Go to Picture Format > Color
Navigate to the Picture Format tab on the top menu ribbon. Click the Color drop-down menu located inside the Adjust group on the left side of the toolbar.
Step 3: Choose Set Transparent Color
Scroll toward the bottom of the Color menu and click Set Transparent Color. Your mouse pointer will instantly change into a small eyedropper icon.
Step 4: Click the Background Color to Remove It
Hover over your image and click directly on the solid background color you want to erase. PowerPoint will instantly turn every pixel matching that exact shade completely transparent across the entire image.
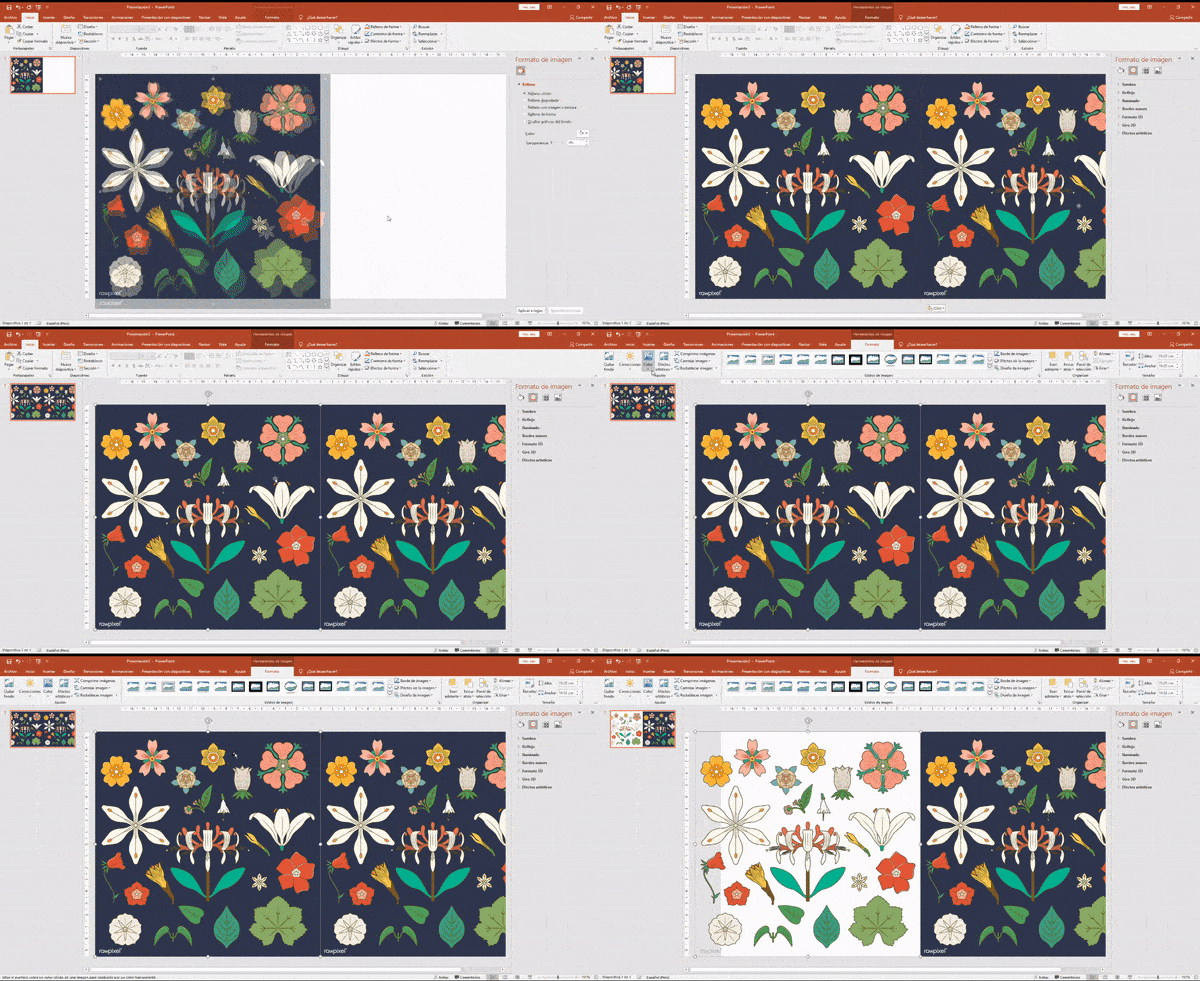
Important Limitation: This quick fix only works on graphics with a single, uniform background color (like a solid white or flat black backdrop). If you are trying to figure out how to make a picture transparent in PowerPoint for a complex photographic background with shadows or color gradients, this tool will leave behind pixelated, messy edges. For complex photos, you'll want to use PowerPoint's Remove Background tool or a dedicated design editor instead.
Knowing when to use this dropper tool versus a full opacity fade makes learning how to make an image transparent much easier when building clean, professional decks!
Transparency Slider vs. Shape-Fill Trick vs. Set Transparent Color
Choosing the right method depends entirely on your software version and the visual outcome you need. Whether you're figuring out how to make a picture on PowerPoint transparent for a soft hero backdrop or simply trying to knock out a solid background behind a company logo, this comparison matrix breaks down when to use each technique.
Which Method Should You Choose?
- Use the Transparency Slider if you are on a modern build and want to soften a photo so the slide copy remains readable.
- Use the Shape-Fill Trick if your toolbar lacks a direct Transparency icon or if you want to crop a semi-transparent image into a custom shape (like a circle or card).
- Use Set Transparent Color if you want the main subject to stay 100% solid while making a flat white or black backdrop disappear.
What Native PowerPoint Transparency Can't Do
While learning how to make images transparent in PowerPoint is a game-changer for quick slide tweaks, it helps to understand the software’s technical limitations. PowerPoint’s built-in tools are designed purely for on-slide visual adjustments; they do not alter the underlying image file itself.
Here are two critical gotchas to keep in mind:
- No Exportable Alpha Channel: None of these native methods create a true alpha-channel transparent PNG file. The transparency effect only renders inside your PowerPoint deck. If you right-click the image and save it to your computer as a standalone asset, it will export as a standard, non-transparent graphic.
- Uniform Fade Only: The Transparency slider fades every pixel of your photo equally. If you are trying to figure out how do i make a picture transparent on PowerPoint while keeping a person or product crisp, the slider alone won't work. It cannot selectively soften a busy backdrop while preserving subject sharpness. To accomplish that look, you'll need to layer a semi-transparent colored shape over the background or use a masked cutout image.
Fade vs. Subject Isolation
Native transparency is meant for soft overlays, watermarks, and flat logo cleanup. If your goal is to cleanly isolate a complex subject from a detailed scene, head over to our step-by-step tutorial on how to remove an image background in PowerPoint for dedicated subject-masking techniques!
When to Do This Yourself vs. When to Get a Designer
Learning these PowerPoint tricks is great when you just need to fade a single photo or clean up a logo for a quick internal sync. But if you are prepping a 30+ slide pitch deck for investors or a major client proposal, doing this manually is a massive time sink.
When you have dozens of visuals that all need consistent opacity, precise cropping, and strict brand alignment, tweaking them slide by slide isn't just tedious; it almost always leads to subtle visual inconsistencies across your deck.
When you're running against a tight deadline, you shouldn't spend your evening wrestling with image formatting panes. That’s where bringing in dedicated presentation designers makes life much easier.
At 24Slides, our brand-trained team can handle all the visual heavy lifting for you. We will standardize every image, clean up your layouts, and polish your full deck in 24 hours or less (with 10-hour rush turnarounds on Pro and Premium accounts). You focus on refining your message, and we'll make sure every single slide looks sharp, cohesive, and professional.
Frequently Asked Questions
How do I insert a transparent image into PowerPoint?
To insert an image that is already transparent, go to Insert > Pictures > This Device, then select a file formatted as PNG or SVG. Unlike standard JPEGs (which fill empty background space with a solid white block), PNG and SVG graphic files preserve background transparency. This allows your slide colors, text boxes, and background design elements to show through immediately without needing extra formatting.
How do I make a picture fade to transparent in PowerPoint?
If you want to fade an entire photograph evenly, select the photo, open the Picture Format tab, click Transparency, and pick a preset or drag the slider. If you want a subtle gradient fade, where only one edge of the photo smoothly dissolves into the slide background, draw a rectangle over that section, set its fill to a soft Gradient Fill, and adjust the gradient stops from your slide's background color to 100% transparent.
.gif)
How do I make an image background transparent in PowerPoint?
For graphics with a flat, single-color backdrop (such as a logo on a plain white block), select the image, go to Picture Format > Color, and choose Set Transparent Color. Click the background color with the eyedropper pointer to erase it instantly. If your photo features a busy or complex background, use Picture Format > Remove Background instead to mark and isolate your main subject, then strip away the surrounding scene.
How do I make a picture transparent in Google Slides?
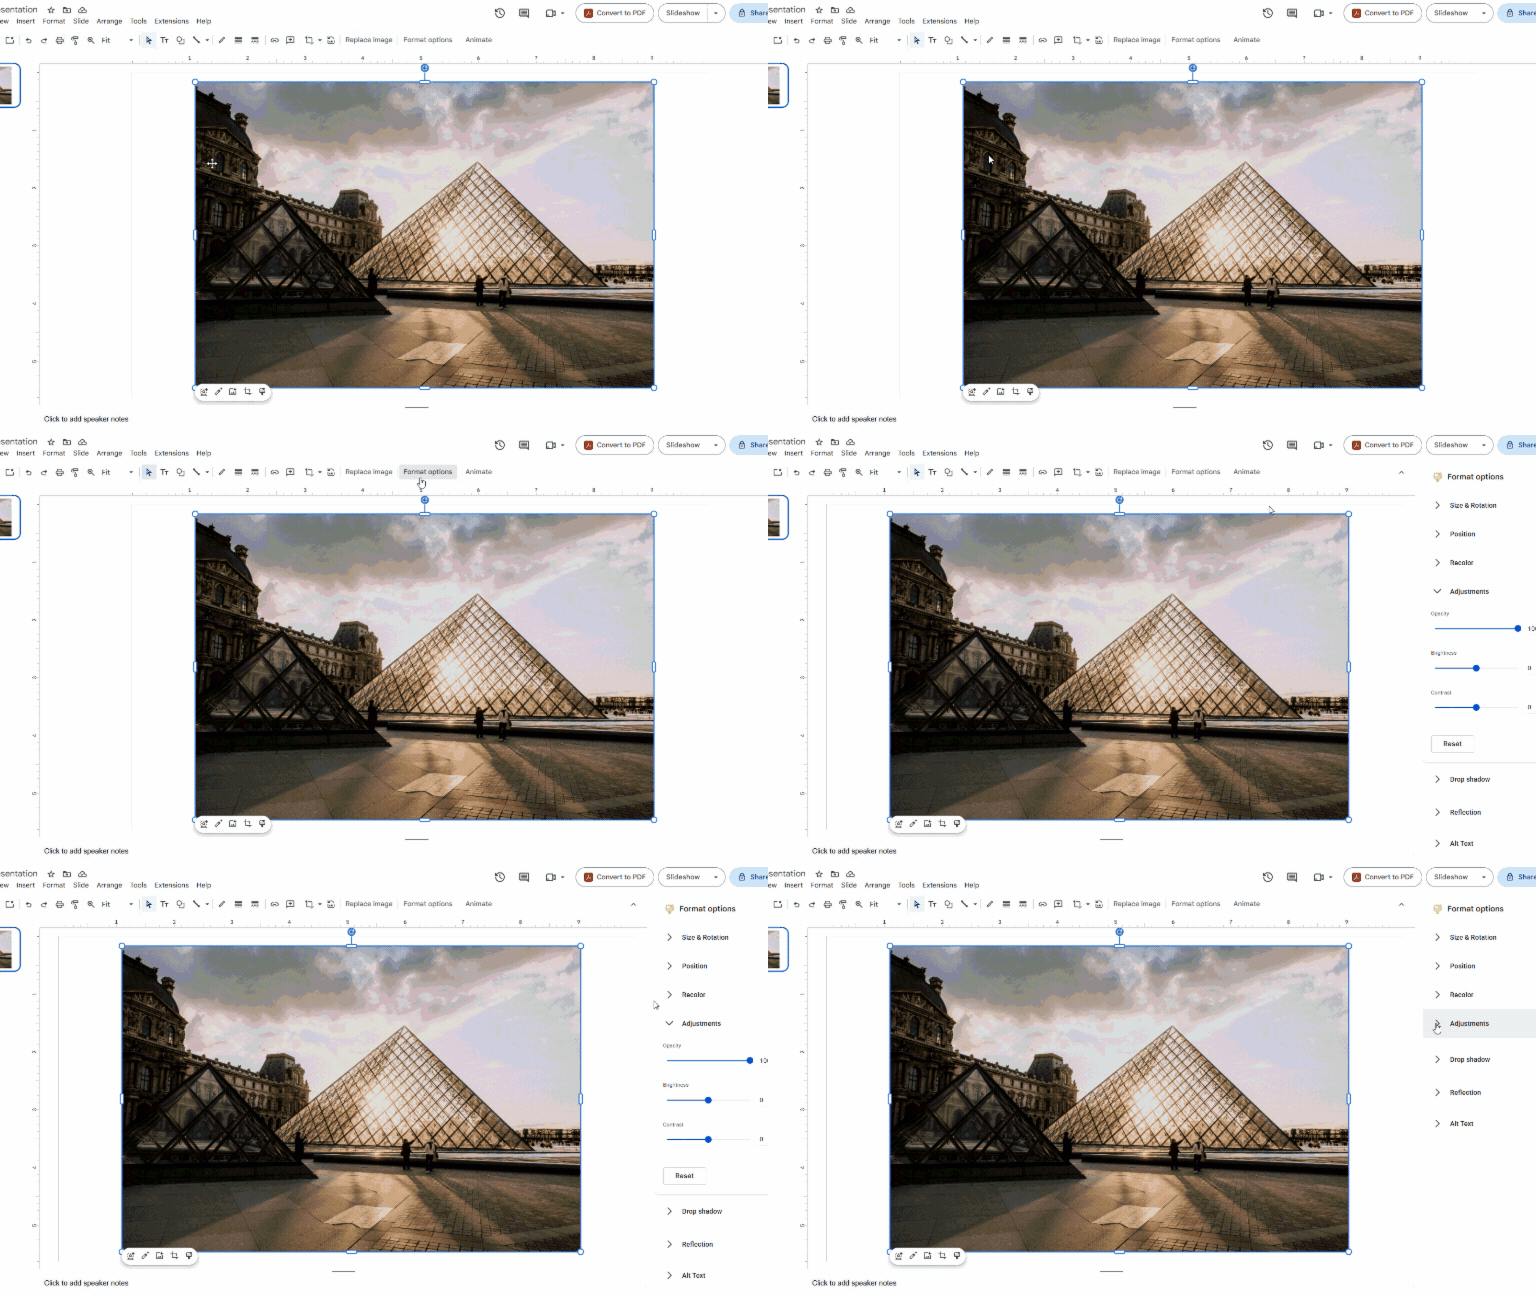
If you are collaborating across different slide platforms and wondering how the workflow compares, adjusting opacity in Google Slides is very straightforward. Select your photo, click Format options on the top toolbar, expand the Adjustments panel on the right, and drag the Opacity slider. While the interface differs slightly, it achieves the exact same visual result as learning how do you make pictures transparent in PowerPoint.
Why doesn't my version of PowerPoint show a Transparency option?
The direct ribbon tool under Picture Format > Transparency is exclusively available on modern builds like Microsoft 365, PowerPoint 2021, up to PowerPoint 2024. If you are running PowerPoint 2019, 2016, or an older desktop release, your toolbar will not feature this icon. You can easily work around this limitation by drawing a shape, navigating to Format Shape > Picture or texture fill, uploading your image into the shape, and using the shape fill transparency slider instead.
Next Step
Mastering these three PowerPoint techniques gives you complete control over your slide visuals, regardless of your software version or image type. Modern Microsoft 365, 2021, and 2024 users can smoothly fade an entire photo using the native Transparency slider. For legacy PowerPoint builds, the Shape-Fill trick unlocks hidden opacity controls by filling a vector shape with your photo. When you simply need to erase the flat background behind a logo or icon, the Set Transparent Color tool provides a quick, one-click fix.
However, if your team produces high-stakes decks and spends valuable hours manually tweaking image formatting, slide-by-slide formatting can quickly create a presentation bottleneck. 24Slides provides managed presentation design capacity through our Pro and Premium plans, connecting your business with a dedicated, brand-trained team to handle all your visual needs. Let us keep your slides clear, credible, and on-brand, so your team can focus on what matters most.

If you want to know more about working with images in PowerPoint, here are some amazing tips to help you make an even better presentation.