Master Slides 101: How to Create and Use Master Slides in PowerPoint
Get a complete overview of one of PowerPoint’s best tools: Slide Master!
The Slide Master in PowerPoint is, in short, an option that allows you to standardize specific visual aspects of your presentation.
It’s a feature that not many people are aware of. However, it can truly make a difference when you constantly work with presentation decks. If you like working with templates in PowerPoint, you’d love Slide Master!
In this article, we’ll explain what exactly the Slide Master feature is and how you can use it to create outstanding presentations.
We’ll go over the following topics:
- Master Slides 101: What is a Master Slide in PowerPoint?
- Why is Master Slide used? And most importantly: Why Slide Master is used for businesses
- Let’s go step-by-step: How to use slide master in PowerPoint
- How to create master slides in PowerPoint
- How to edit master slide in PowerPoint
- Ready to start? Get professional PowerPoint Master Slides!

What is a Master Slide in PowerPoint?
Slide Master is a PowerPoint feature you can find in the View tab. It allows you to create master templates (or master slides). It’s a way to automatically add elements that you want to be repeated throughout your slides, like a font or a theme.

Why is Master Slide used?
The Slide Master feature in PowerPoint is extremely useful for making your presentation design process more efficient. The main reason it’s used is because it helps you customize all of your PowerPoint elements at once.
That’s right, there is no reason to change slide by slide anymore. With master slides, you can change the typography, logo, and colors and even add your logo and watermark by changing these elements on one single slide. When you adjust one of the elements in the Master Slide, all of those elements will change in all the slides.
Why Slide Master is used for businesses
The slide master is not only a really efficient tool, it also can be great for your business. For example:
- It helps you standardize the design of your presentation: Instead of having a disparate array of different slide designs in your presentations, the Slide Master allows you to establish a consistent and professional look throughout. This consistency can enhance the professionalism of your brand and the clarity of your message.
- Or even better, it helps you brand your presentations: Something as simple as using your brand’s color scheme can make all the difference in creating truly unique slides. It can even help you convey values and ideas you want to be associated with your brand.
How to use slide master in PowerPoint
To create your own Master template, you just need to go to the View tab > Slide Master. This will allow you to access the Slide Master view.

How to create master slides in PowerPoint
Follow these steps to learn how to create a presentation using master slides in PowerPoint:
#1. Work on your main Slide Master
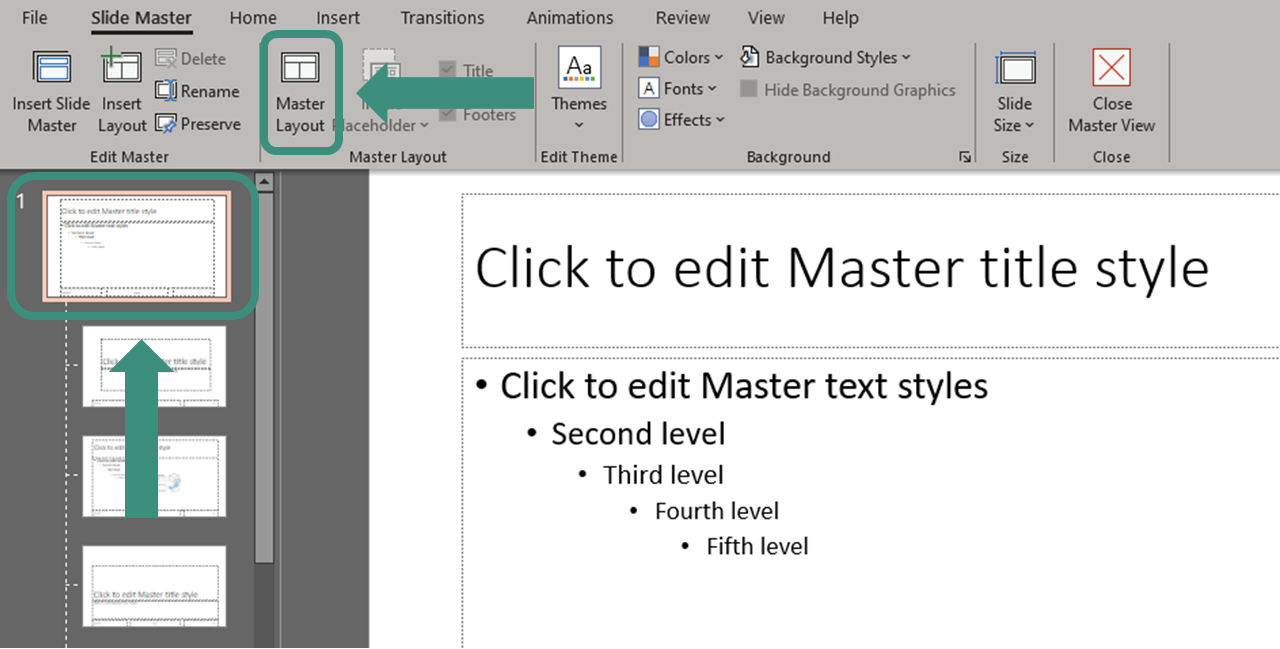
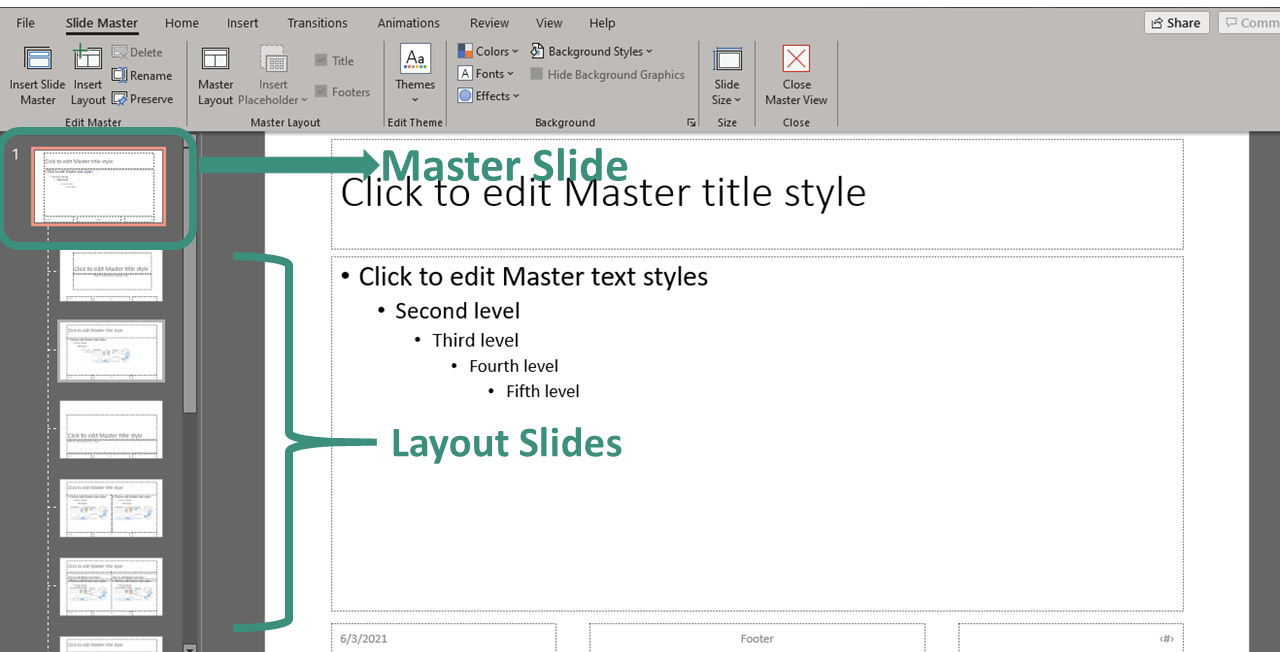
Once you are on the Master View, it’s time to get to work! Go to the very first slide on the Slides Overview Pane on the left. This is your Master Slide. You’ll recognize it because it’ll have a number 1 at the side, and it’ll be a little bigger than the rest:

Here is where you’ll work on the common elements all your slides will share. This is where you should customize your background, font style, and color. This is also the perfect opportunity to add an element you want to repeat throughout your slides, like a logo. Take into account that anything you do while in this mode will then be reflected in all the rest of your slides.
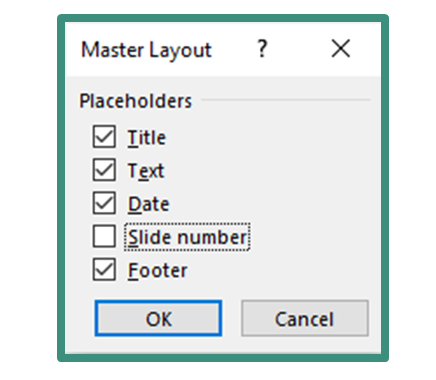
By clicking on the Master Layout option, you’ll also be able to customize which layout elements you want in your presentation slides.

For example, you can choose to include the date, the slide number, and more.

#2. Work on your Layout slides
Next, it’s time to move to the Layout slides. These are slides that appear below your Master Slide. In other words, these are your actual slides.

You’ll notice that PowerPoint offers 11 different default layout settings for you to start to work with. You can edit and alter these layouts as much as you want. Consider that these are meant to make your life easier when designing your presentation. That’s why it’s important to think through what kind of layouts your presentation will need.

If you don’t find a layout that fits your needs, you can also create a master layout from scratch. Select any of your layouts and click the option Insert Layout in the Edit Master group.

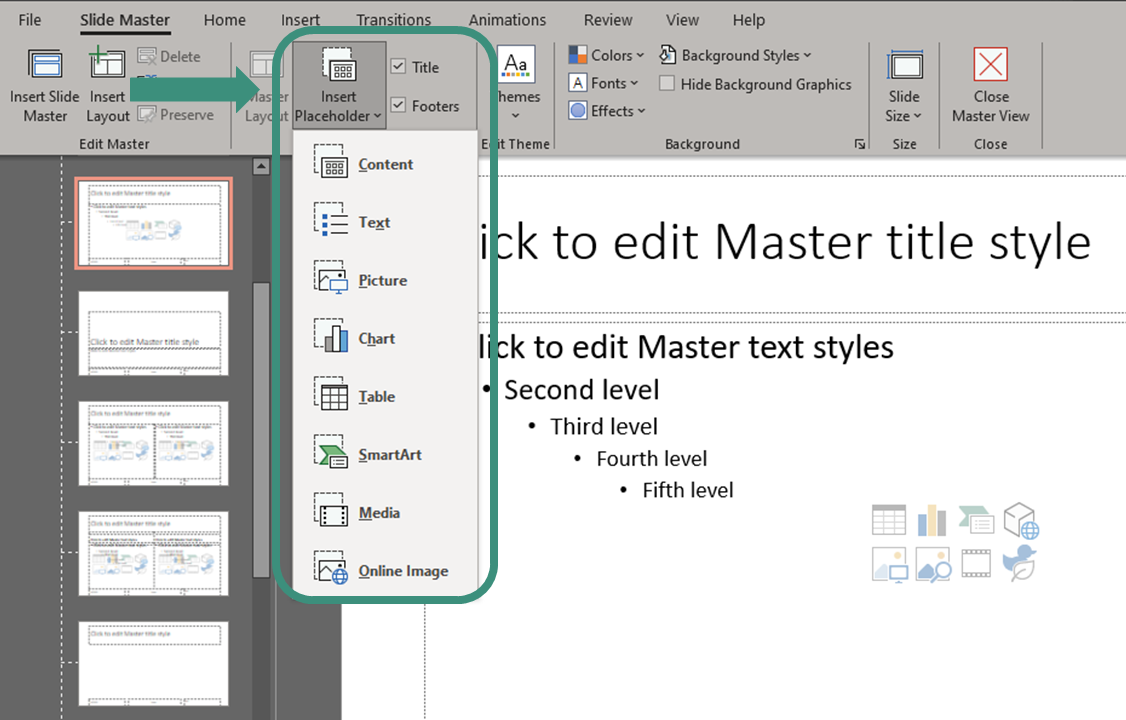
It’ll create a new type of slide you can edit and customize as you see fit. Use the option Insert Placeholder to add different kinds of elements to our new layout.

#3. Adding a new Slide Master if necessary
If you think just one “theme” is not enough for your presentation and want to use several different styles, or segments, in a single presentation, you can do it! You just need to add a second Slide Master. Select Insert Slide Master on the far left, and you’ll get a completely new Master slide in the same presentation.

You’ll be able to see your two different master slides, and the layout slides below each one:

Once you’re happy with how your master template looks, remember to click the option Close Master View so you can see your changes.

How to edit master slide in PowerPoint
If you’ve worked with a presentation that’s already using a master template, you can edit your slides through Master View. Especially if there are common elements you want to eliminate, add, or edit on more than one slide!
#1. Access the Master Slide View
Just like for creating a master template, the first thing is to access the master view. Go to View tab > Slide Master to see exactly all the design guidelines your presentation has at the moment.
#2. Edit the Master Slide
If there’s a common element that you want to change, the Master Slide is the place to do it! It works great for adding and removing logos or changing the background or color scheme.
#3. Edit Specific Layout Slides
If there’s a design element you want to change from a specific layout style, you can do so, too. Pick the slide layout you want to edit and customize as you see fit.
Remember that all the slides below the master slide will have these changes. So, if you are looking for a specific change in one of the slides, it’s better to avoid the Master Slide view and edit your slides as you normally would.
Get professionally customized PowerPoint Master Slides
Master Slides are an outstanding tool to make your presentation creation process more efficient. They can save you precious time and enhance design consistency within your slides.
However, using master slides still requires a steep learning curve. Design skills are a must if you truly want to make the most of your master slides. If you’re going to use PowerPoint Master Slides but don’t feel you have enough experience or time to create your master template, don’t worry! 24Slides professional designers will be happy to help you make the perfect master slides. You can just sit back and relax, and we’ll do all the heavy lifting!
The best thing is that you’ll get a completely customized, professional design that you’ll be able to apply to all your future projects! You’ll no longer have to worry about your slide design or making it reflect your brand! Get an outstanding presentation design that you can apply to your own slides with just one click.


