How to Add & Install Fonts in PowerPoint (Windows & Mac Guide)

Did you know a simple change like adding custom fonts in PowerPoint can instantly elevate your message? That's right. Moving beyond the default Arial and Calibri isn't just about aesthetics; it's about making your slides stand out and demonstrating meticulous attention to detail and brand consistency.
Backed by 12+ years of presentation design expertise, we understand the power of a truly impactful slide. Today, we'll show you how to add fonts to PowerPoint. We will guide you step-by-step, whether you're using Windows or Mac, and we’ll even share where to get custom fonts (for FREE!). Get ready to leave a lasting impression on your audience!

Here are the topics we'll cover:
- Why Custom Fonts Are a Game-Changer for Your Presentations
- Where to Find Your Next Favorite Font (Free & Premium Options)
- How to Download Fonts to PowerPoint (Pre-Installation Steps)
- How to add fonts to PowerPoint: Windows & Mac
- Troubleshooting: Why is the Installed Font Not Showing Up?
- Embedding Fonts: Your Key to Universal Presentation Compatibility
- Expert Tips for Using Custom Fonts in PowerPoint (24Slides Perspective)
- Frequently Asked Questions (FAQs)
- Your Fonts Are Ready, Now Let 24Slides Design the Rest!
Why Custom Fonts Are a Game-Changer for Your Presentations
Leveraging fonts beyond the standard options isn't just a design tweak; it's a strategic move that significantly enhances the impact and perception of your presentation. Here's why embracing custom fonts in PowerPoint is a true game-changer:
Elevate Your Brand Identity & Professionalism
- Beyond Generic: In a sea of presentations using Arial, Calibri, or Times New Roman, a unique font helps you set your content apart. It conveys a deliberate approach that your presentation is an extension of your brand or message, and it deserves attention.
- Consistency is Key: For businesses, custom fonts are indispensable for maintaining brand consistency across all visual communications, from marketing materials to internal reports. This reinforces your brand identity, making your presentation recognizable and more credible.
Unlock Distinctive Style & Creative Expression
- Visual Personality: Fonts are much more than just text; they carry emotion and personality. A custom font perfectly aligns the visual style of your words with the tone of your message, whether it’s authoritative, friendly, or elegant.
- Show, Don't Just Tell: Especially for creative portfolios, design pitches, or any presentation aiming to showcase originality, custom typography is your canvas. Choose a font that truly represents what you want to convey, or better yet, create your own.
Boost Engagement & Memorability
- Break Through the Clutter: Our eyes are naturally drawn to what's distinctive. Custom fonts act as a subtle disruptor, catching the viewer's attention and making your slides more visually engaging.
- Lasting Impression: A presentation that looks unique is a presentation that is remembered. By moving beyond the conventional, you craft an experience that resonates with your audience. Making your key takeaways and overall message stick in the long term.

Where to Find Your Next Favorite Font (Free & Premium Options)
Ready to explore beyond the default fonts? Here are the top places to download fonts for PowerPoint, whether you're looking for free options or professional-grade licenses.
Top Free Font Websites
These sites are excellent for personal use and exploring. You can find a wide range of fonts. Always check the specific font's license (EULA) for commercial use, as terms can vary.
- Google Fonts: A vast library of high-quality fonts, all 100% free for personal and commercial use. Easy to browse and test.
- Font Squirrel: Curated collection of free fonts, often with clear commercial-use licenses. A reliable choice for quality.
- DaFont & 1001 Fonts: Huge selections, often categorized by style. Be extra diligent here; many are free for personal use only.
Professional & Premium Font Sources
For brands, businesses, or projects that require specific typefaces and robust licensing. These platforms offer high-quality, supported options.
- Adobe Fonts: Included with Adobe Creative Cloud subscriptions, offering seamless integration and commercial licenses.
- MyFonts & Fontspring: Leading marketplaces for professional fonts from top foundries, offering comprehensive licensing.
Expert Tip: Check the Font License (EULA)!
Whenever you download a font, always take a moment to review its End User License Agreement. This is especially important if you plan to use the font in commercial projects, as it helps you avoid potential issues later on. Reviewing the EULA ensures that you are legally permitted to use the font for your intended purpose, whether it be personal, commercial, or any other use.
How to Download Fonts to PowerPoint (Pre-Installation Steps)
Downloading them is very easy. Let's take a look at how to do it using 1001 fonts:
- First, click Commercial free (1) to access the free fonts.
- Then, if you know your font’s name, go to Search for fonts (2) and type in its name.
- If you don’t have a font in mind, you could search for one by browsing the Font Categories (3).
- Next, you can type a test word in the search bar above the fonts (4) to see what different fonts look like.
- Finally, after selecting your font, click Download (5).

If you have no idea which font to use, start by considering the overall theme and tone of your presentation. Maybe it's a corporate business presentation, or it could be a creative and playful one; knowing the difference is key.
How to add fonts to PowerPoint: Windows & Mac
Now that you've successfully downloaded your custom font file, the next step is to install it in your operating system. I'll show you the quick and easy process for both Windows and Mac.
Installing Fonts on Windows
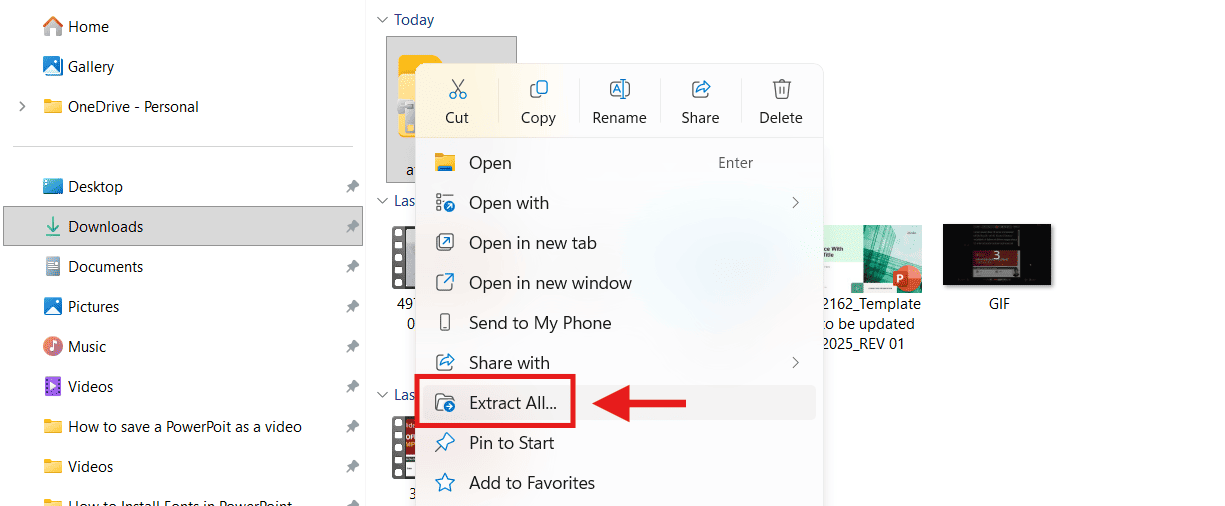
1. Extract the Font File (If needed)
- Locate the downloaded ZIP folder (it often has a zipper icon).
- Right-click the ZIP folder and select "Extract All". This creates a new, uncompressed folder containing the installable font file.
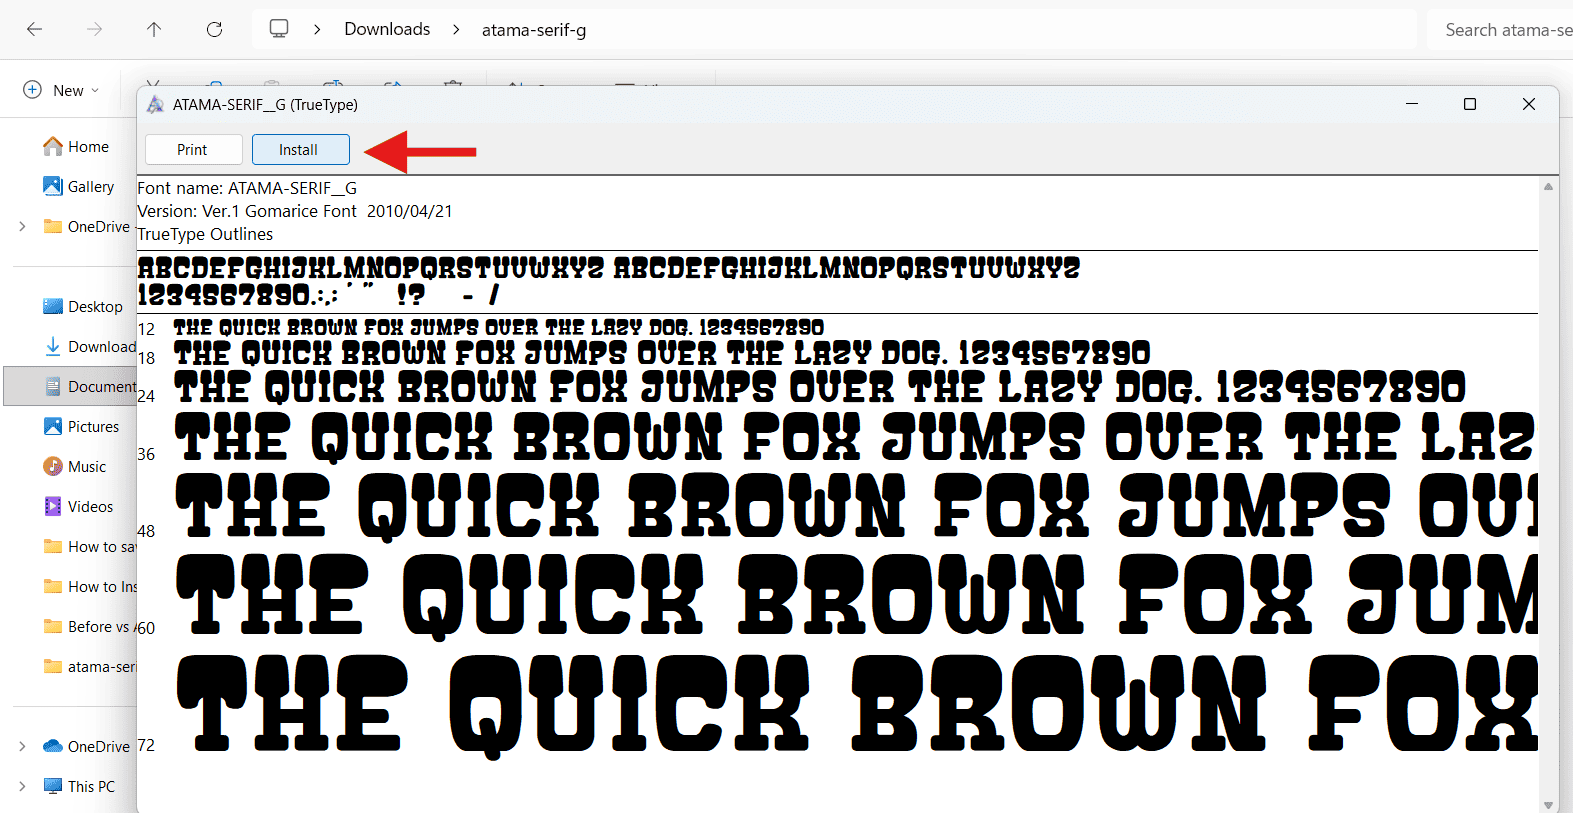
2. Install the Font
- Open the new folder and double-click the font file to open the Font Preview Window.
- Click the "Install" button.
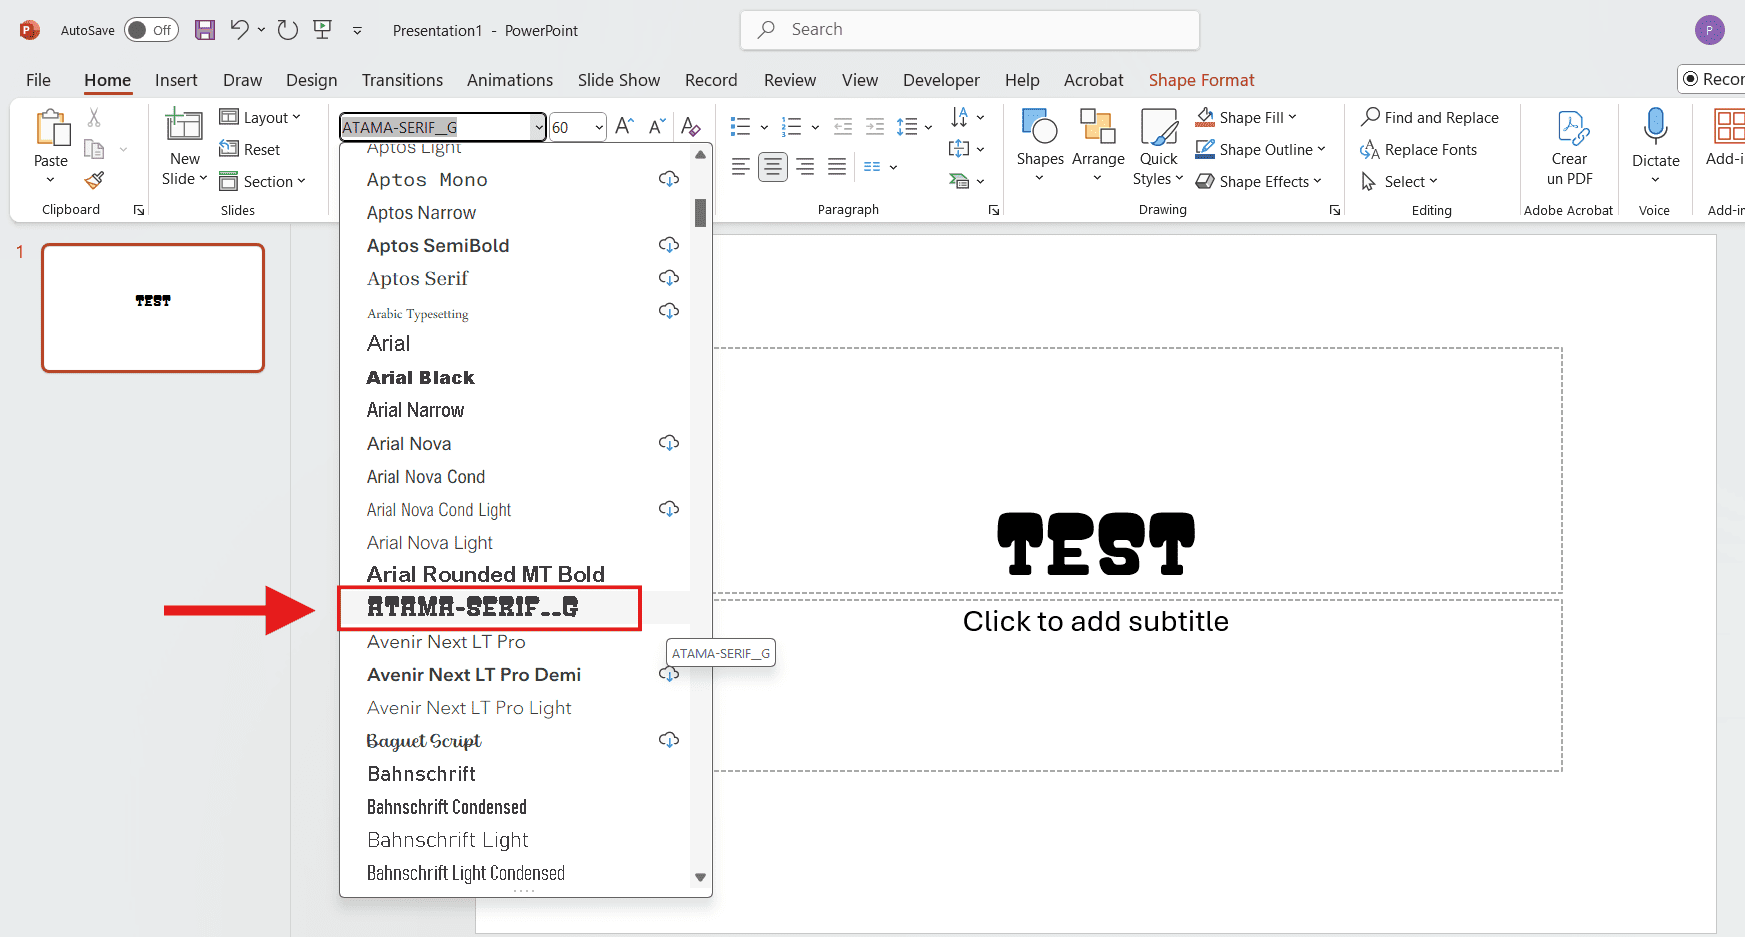
3. Restart PowerPoint (Crucial Step)
- You must restart PowerPoint to ensure the new font is loaded.
- Open your presentation, navigate to the Font drop-down menu, and select your newly installed font.
Installing Fonts on Mac
1. Extract the Font File (If Necessary)
- Locate the downloaded font file. If it's a compressed ZIP folder, simply double-click it. The file will automatically uncompress and create a new folder containing the installable font file.

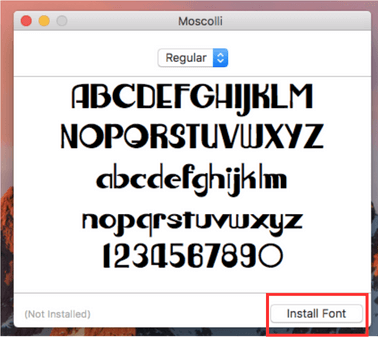
2. Install the Font (Quick Method)
- Double-click the font file. This opens a preview in the built-in Font Book application.
- Click the "Install Font" button.
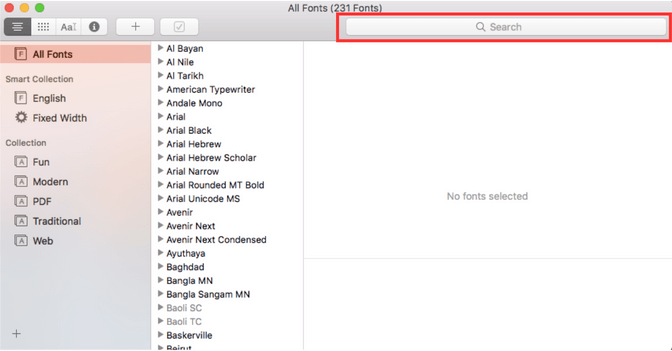
- The "All Fonts" window will then open, showing your new font in the list, which confirms the installation was successful. You can look for your font in the search bar.
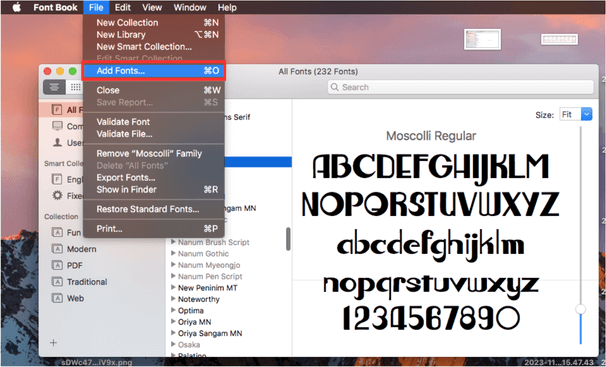
- If it is not there, go to File and select Add Fonts.
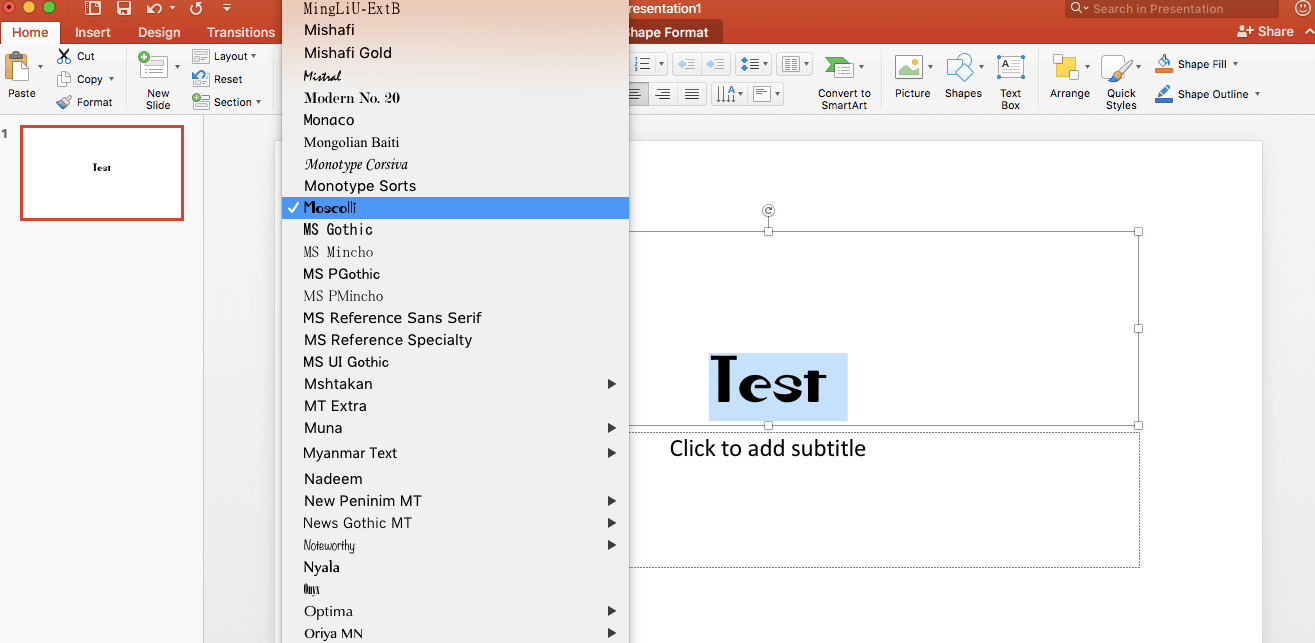
3. Restart PowerPoint and Apply
- Restart PowerPoint (you must do this for the program to load the new font). Open your presentation and select your new font from the drop-down menu.
Troubleshooting: Why is the Installed Font Not Showing Up?
The most common issue after downloading and installing a font is simply that PowerPoint needs a refresh. If restarting the program doesn't work, here are alternative steps to force the installation on your operating system.
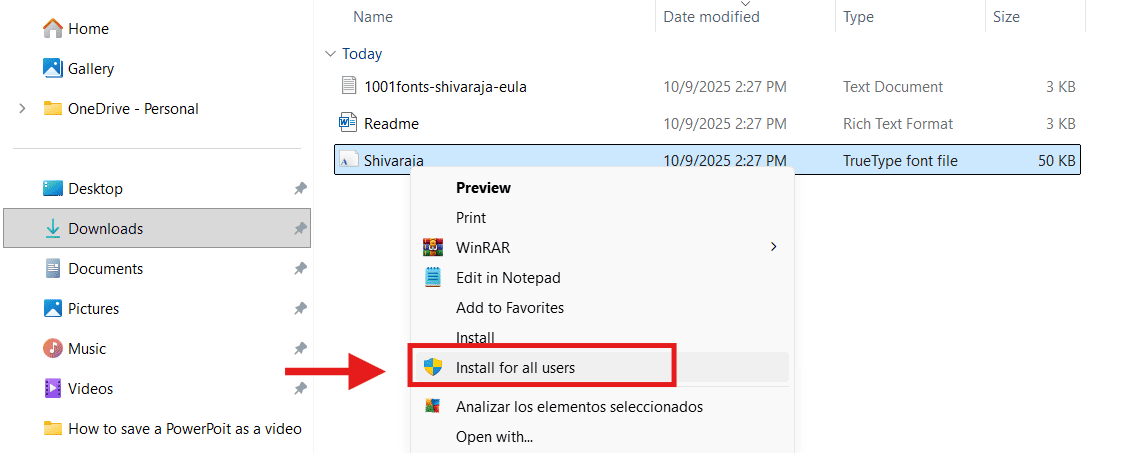
Method 1: Install for All Users
This method ensures the font is correctly registered across the entire system.
- Locate the font file (.ttf or .otf) in your Downloads folder.
- Right-click on the font file and select “Show more options”.
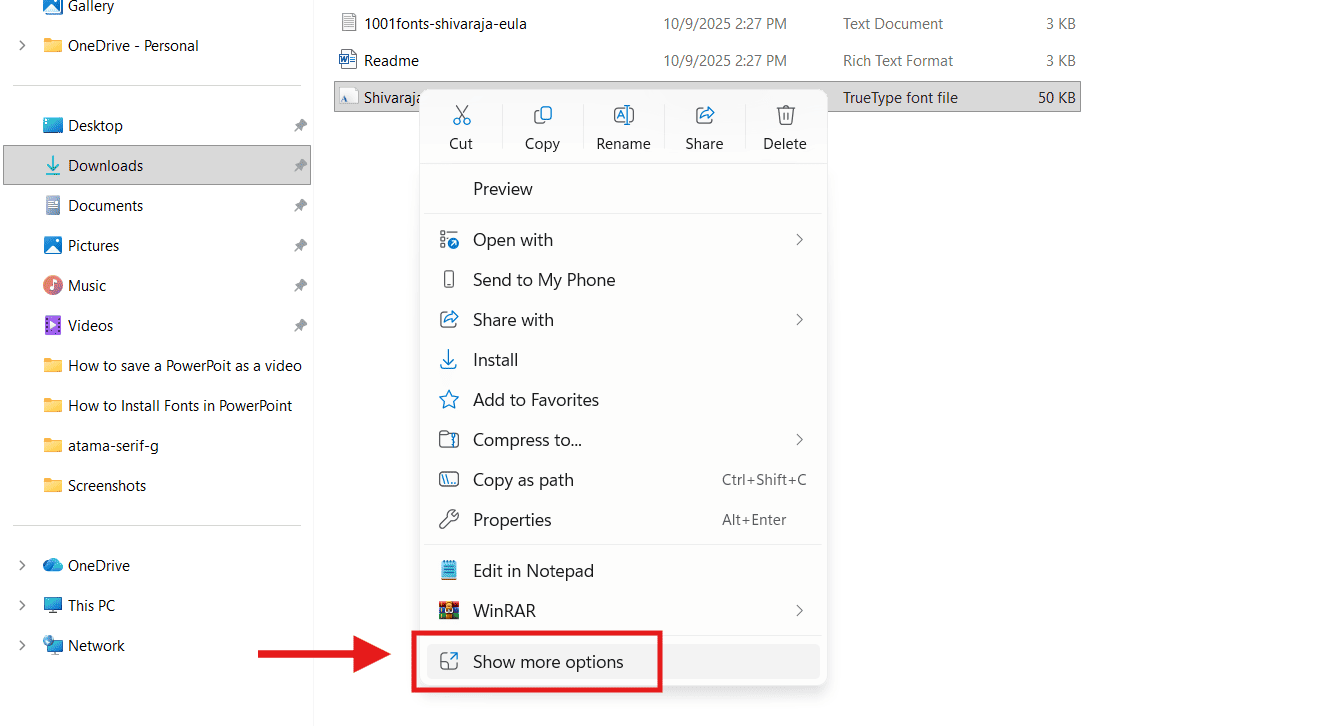
- Click on "Install for all users."
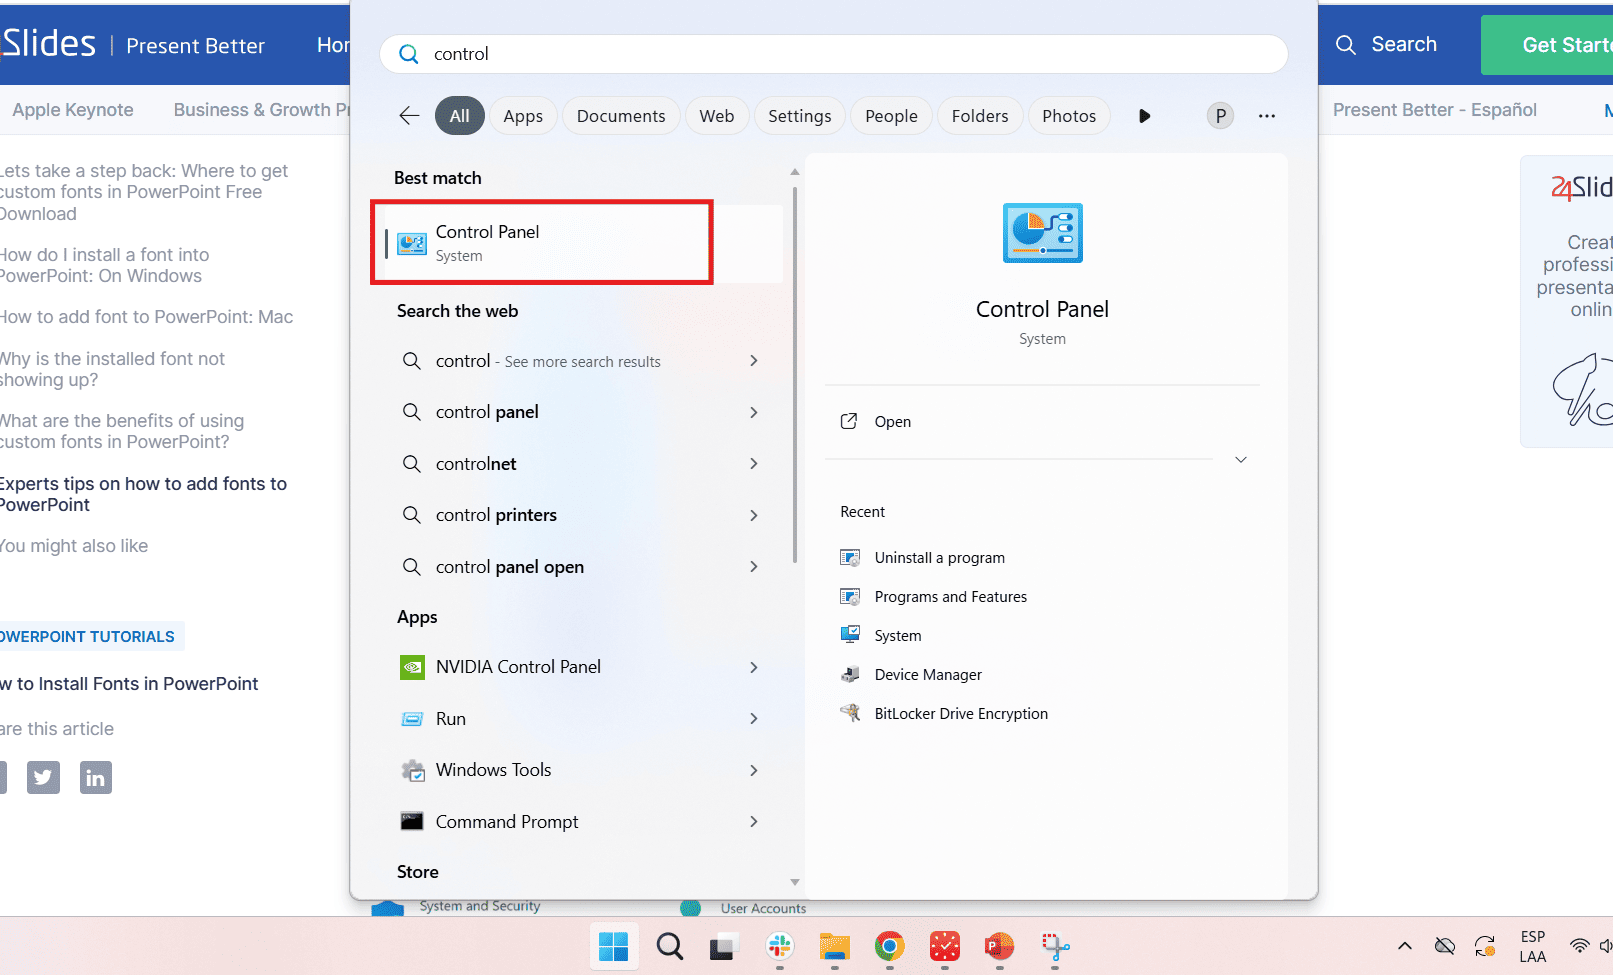
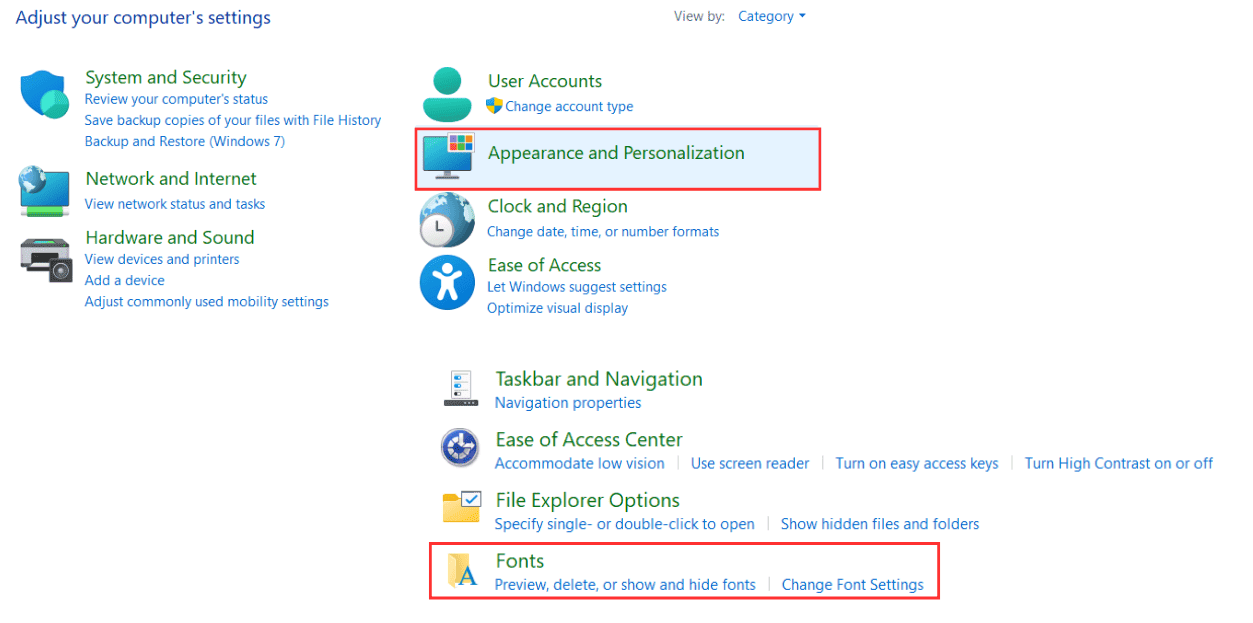
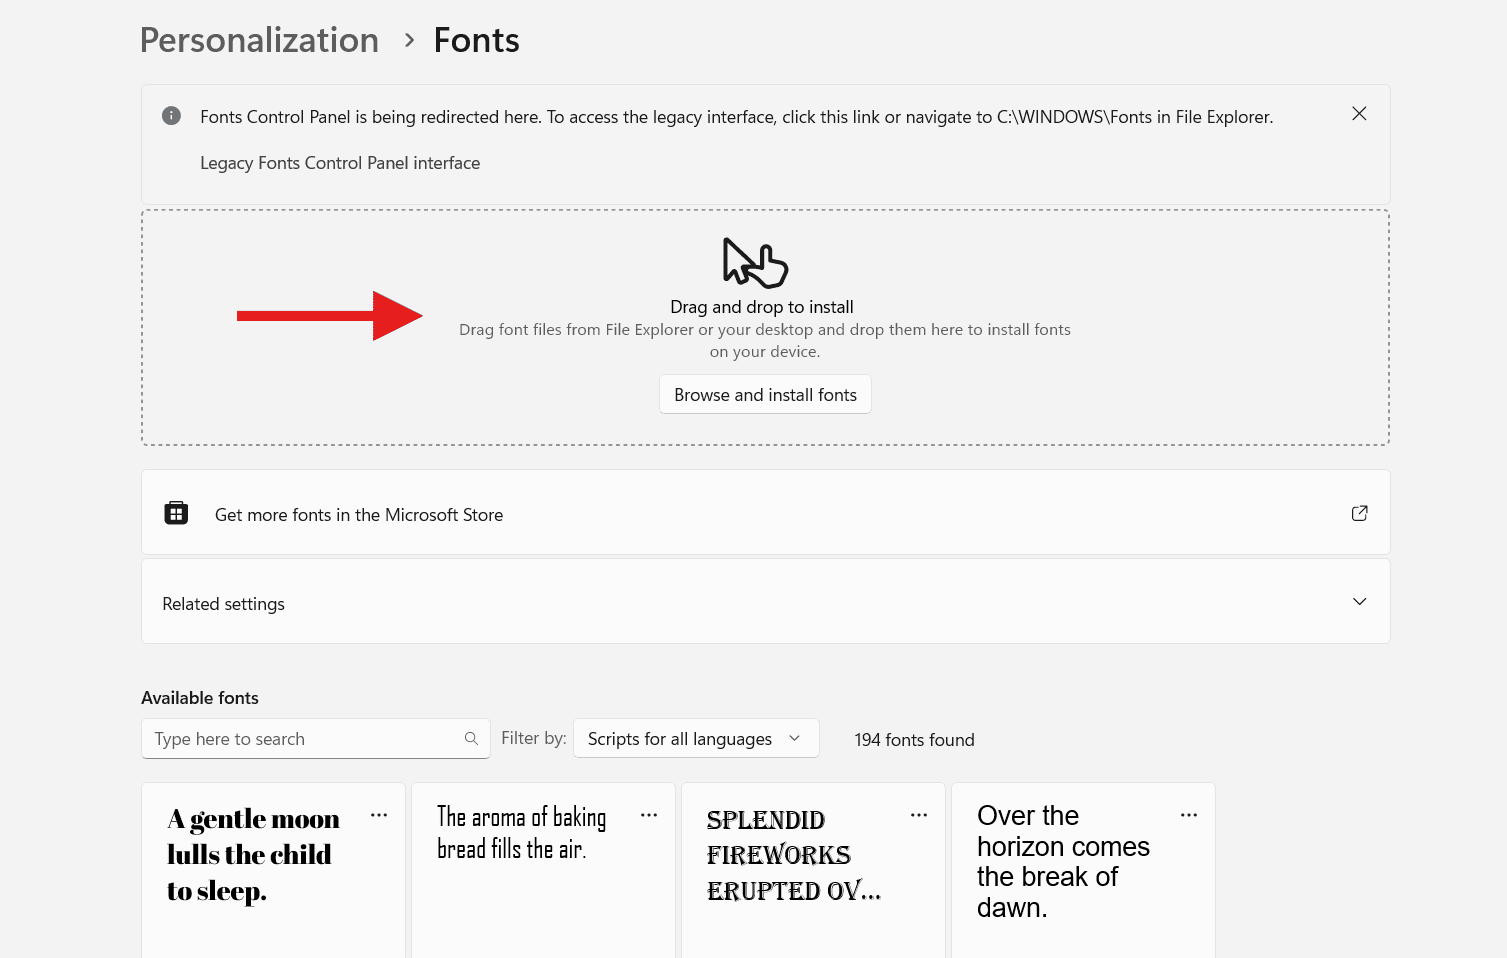
Method 2: Drag and Drop via Control Panel
This classic method manually forces the font into the correct system folder.
- Search for and open the Control Panel.
- Select "Appearance and Personalization," then click "Fonts."
- When the Fonts folder opens, drag and drop your font file directly into the folder.
Embedding Fonts: Your Key to Universal Presentation Compatibility
Why Embedding is CRITICAL (The Final Solution for Sharing)
You've successfully solved any initial issues with fonts not showing up on your own computer. However, the battle for consistent design isn't over yet.
The Nightmare Scenario: Imagine sending that polished presentation to a client or loading it on a conference computer, only to see your amazing custom font suddenly replaced by generic Arial or Calibri. That design disaster happens because the new computer simply doesn't have your specific font installed.
Embedding is the final, crucial step. It saves your custom font inside your PowerPoint file. This ensures that your slides are exactly as you designed them, regardless of where they are opened.
How to Embed Fonts in PowerPoint for Windows
Windows PowerPoint offers the best controls for embedding. Follow these quick steps before you save and send your final presentation:
- Go to the File tab.
- Click Options in the bottom-left corner of the window.
- In the PowerPoint Options dialog box, select the Save category on the left.
- Then, check the box that says "Embed fonts in the file."
- Under that option, select the second choice: "Embed all characters (best for editing by other people)."
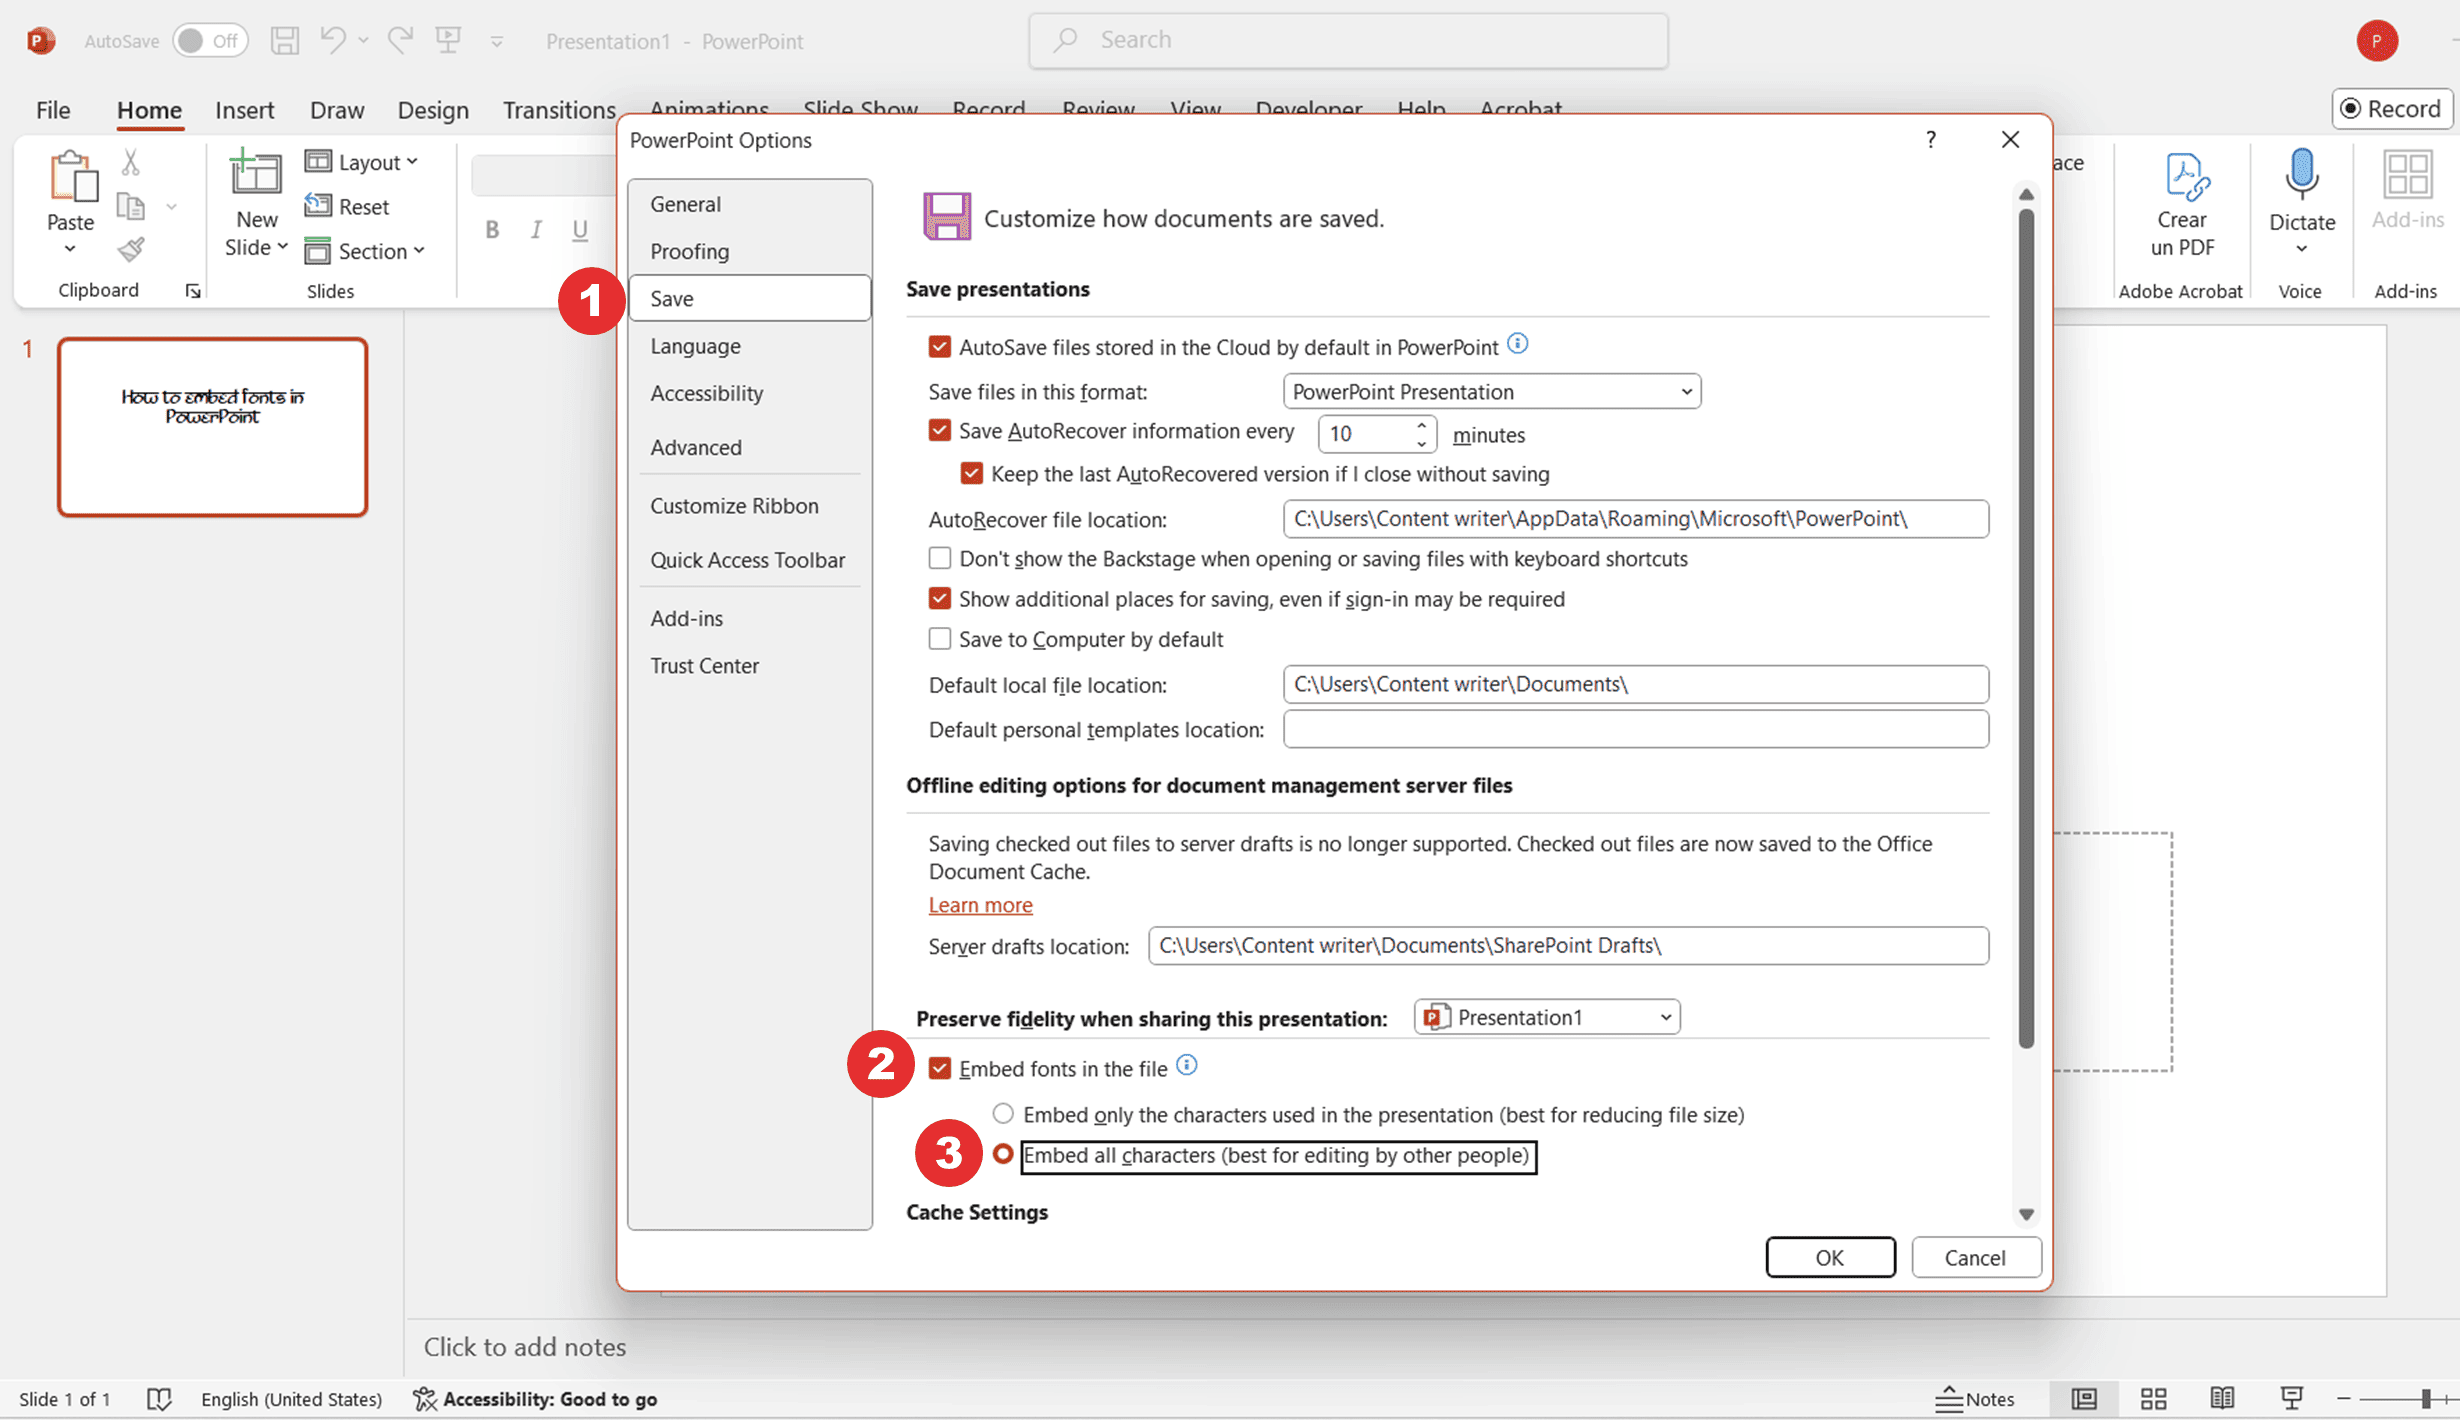
- Click OK to save the changes. Your file size will increase, but your custom fonts will display consistently on any device!
Expert Tips for Using Custom Fonts in PowerPoint (24Slides Perspective)
While the process of installing and embedding fonts is straightforward, true presentation mastery lies in how you choose and use them. Our expert designers emphasize the following key considerations for elevating your slides:
1. Choose Fonts with Strategic Intent
Selecting a font is a design decision, not just a cosmetic one. Go beyond simply trying to be unique. Every font should serve a clear purpose; whether it's reinforcing your brand identity, stimulating creativity, or maximizing readability. Always opt for typefaces that align with your content's theme and are highly legible, especially when viewed on a large screen or projector.
2. Prioritize Licensing and Compatibility
Protect your business and your design. Never assume a font is free to use commercially. Always check the End-User License Agreement (EULA) for commercial rights before sharing your presentation externally. Additionally, confirm compatibility with your computer and the programs you'll be using to avoid any technical issues.
3. Master the Art of Font Pairing
Effective typography relies on hierarchy. Experiment with font combinations, typically one for headlines and one for body text. This creates a clear and visual structure to guide your audience. The cardinal rule: Limit your choices to two or, at most, three compatible fonts to maintain a professional, cohesive, and polished look.
4. Explore typography trends
While classic fonts are always a safe option, exploring modern typography trends can add a contemporary touch to your presentation, instantly enhancing its visual appeal. However, ensure any modern typeface remains coherent with your overall visual brand. And, last but not least, it doesn’t compromise the core goal of readability.
Frequently Asked Questions (FAQs)
How do I add a font to PowerPoint?
- Download the font file (.ttf or .otf) and extract it from the ZIP folder.
- Right-click the font file and select Install (or Install for all users).
- Completely restart PowerPoint so the program recognizes the new font.
How to Embed Fonts in PowerPoint for Mac?
- Go to the PowerPoint menu in the top-left corner of your screen.
- Select Preferences from the dropdown menu.
- In the dialog box that opens, click Save (under the "Output and Sharing" section).
- Under Font Embedding, check the box for "Embed fonts in the file."
- Crucially: Select the option to "Embed all characters (best for editing by other people)."
- Close the Preferences window and save your presentation.
Can I add new fonts in the web version of PowerPoint?
Unfortunately, no. The PowerPoint web version is designed for lightweight editing and relies only on its built-in Cloud Fonts and standard system fonts. It does not support installing new custom fonts or managing the embedding options.
For full control over custom fonts and to secure your presentation's design, you must use the desktop application (PowerPoint for Windows or Mac).
How can I confirm a font is embedded in my PowerPoint file?
The most reliable way to check the status of your embedded fonts is through the file's advanced properties:
- Open the presentation file.
- Go to the File tab, and click Info.
- In the right column, click the Properties dropdown and select Advanced Properties.
- In the dialog box that appears, click the Contents tab. This panel will list the "Fonts used" and indicate which ones are saved with the file.
Quick Check: You can also confirm embedding by comparing the file size before and after saving the file. If the size increases, the embedding was successful.
Are all custom fonts free to use commercially?
Absolutely not. This is one of the biggest disadvantages when using free custom fonts.
You must always check the font's End-User License Agreement (EULA), which is the copyright document that defines how you can legally use the font.
- Personal Use: Many fonts labeled "free" are only free for personal, non-business projects.
- Commercial Use: If you are using the font for any business-related content (presentations shared with clients, public marketing materials, etc.), you likely need a specific Commercial License.
If you plan to use a free font for your business, look only for fonts explicitly designated as royalty-free to protect yourself from legal issues.
Your Fonts Are Ready, Now Let 24Slides Design the Rest!
You already know how to add fonts in PowerPoint and have mastered the technical issues. The foundation is set, now let our 200+ dedicated designers take over.
At 24Slides, we leverage over 12 years of expertise in elevating your presentation into a truly compelling visual narrative. Last year alone, we served clients in 74 countries, delivering 325,624 hours of valuable time back to our customers.
Experience the 24Slides difference for yourself. For just $1, you’ll receive a custom, editable one-slide presentation tailored to your brand. It's the perfect, low-risk way to see the impact of professional design.
This is a full $43 value, offered to you for only $1.

Want to make better PowerPoint slides? Read this!