How to Remove Background From Image in PowerPoint (Step-by-Step Guide)

Cleaning up an image can instantly make a slide feel sharper and more professional, and you don’t need advanced design tools to do it. Learning how to remove background from an image in PowerPoint is one of the quickest ways to create cleaner visuals, whether you’re preparing a pitch, a report, or a training deck.
PowerPoint’s built-in Remove Background tool lets you isolate the part of the image you actually want to use and remove everything else, including solid-colored areas that usually get in the way.
In this guide, you’ll see exactly how to remove background in PowerPoint and how to get more accurate results when the tool doesn’t detect the edges correctly. We’ll also cover what to expect across PowerPoint Desktop, Online, and Mobile, as well as simple alternatives you can use when you need a cleaner cutout.
Here are the topics we’ll cover:
- What Is PowerPoint’s “Remove Background” Tool?
- How to Remove the Background From an Image in PowerPoint (Desktop Tutorial)
- Limitations of PowerPoint’s Background Removal Tool
- Troubleshooting When Background Removal Doesn’t Work Correctly
- Differences Between PowerPoint Online vs Desktop, vs Mobile

What Is PowerPoint’s “Remove Background” Tool?
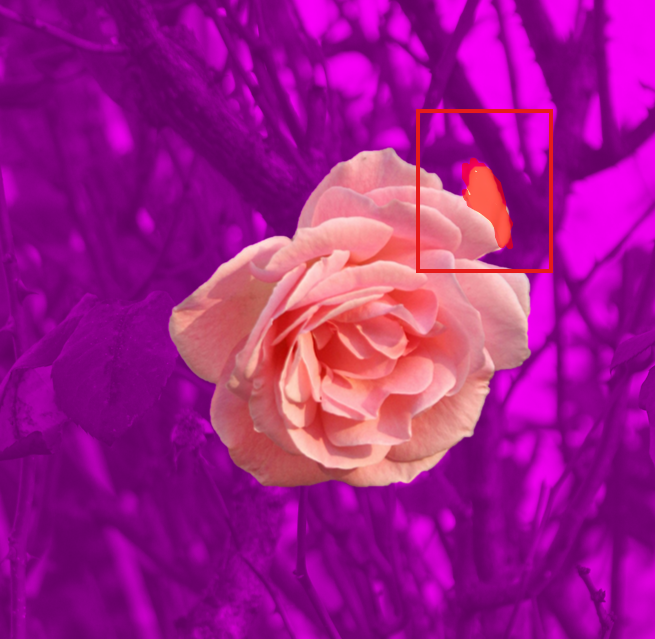
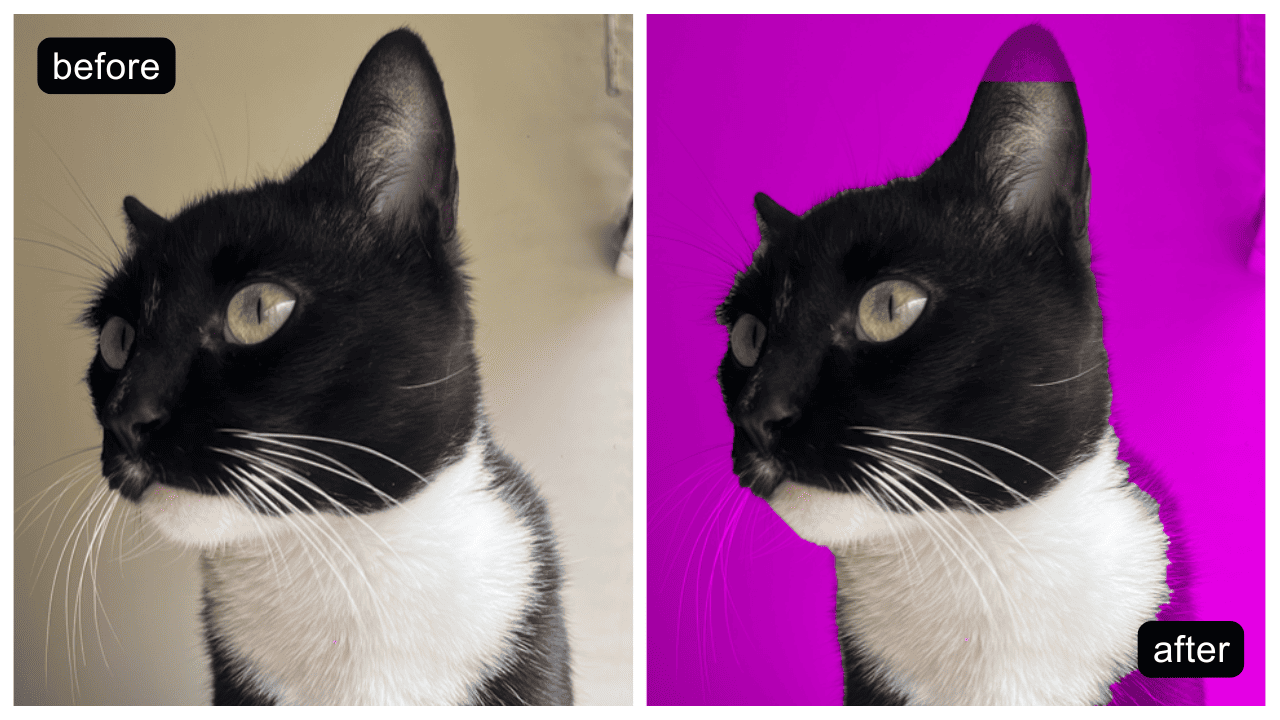
PowerPoint’s Remove Background tool automatically identifies the subject of your image and highlights the background in magenta, allowing you to remove it instantly. This built-in feature makes it easy to remove a background in PowerPoint, isolate the part of the photo you actually want, and streamline your slide design without relying on outside editing tools.
Where to Find the Remove Background Tool in PowerPoint
The Remove Background tool only appears when you select an actual picture. Once you click an image, PowerPoint opens the Picture Format tab, sometimes shown as Picture Tools → Format in older versions. Microsoft Support, this contextual tab is hidden by default, which is why many users can't find it when searching for how to remove the background of an image in PowerPoint.
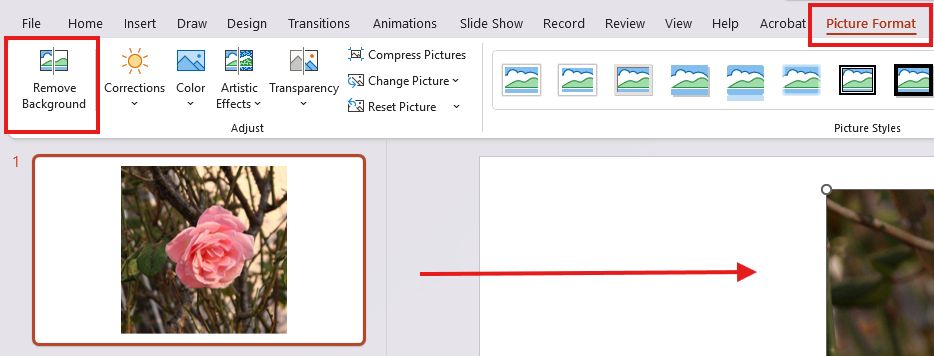
The navigation is simple once you know where to look: Select your picture → Picture Format → Adjust → Remove Background.

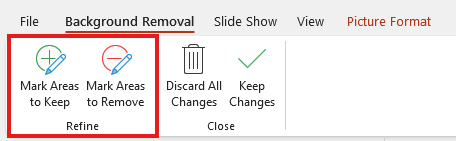
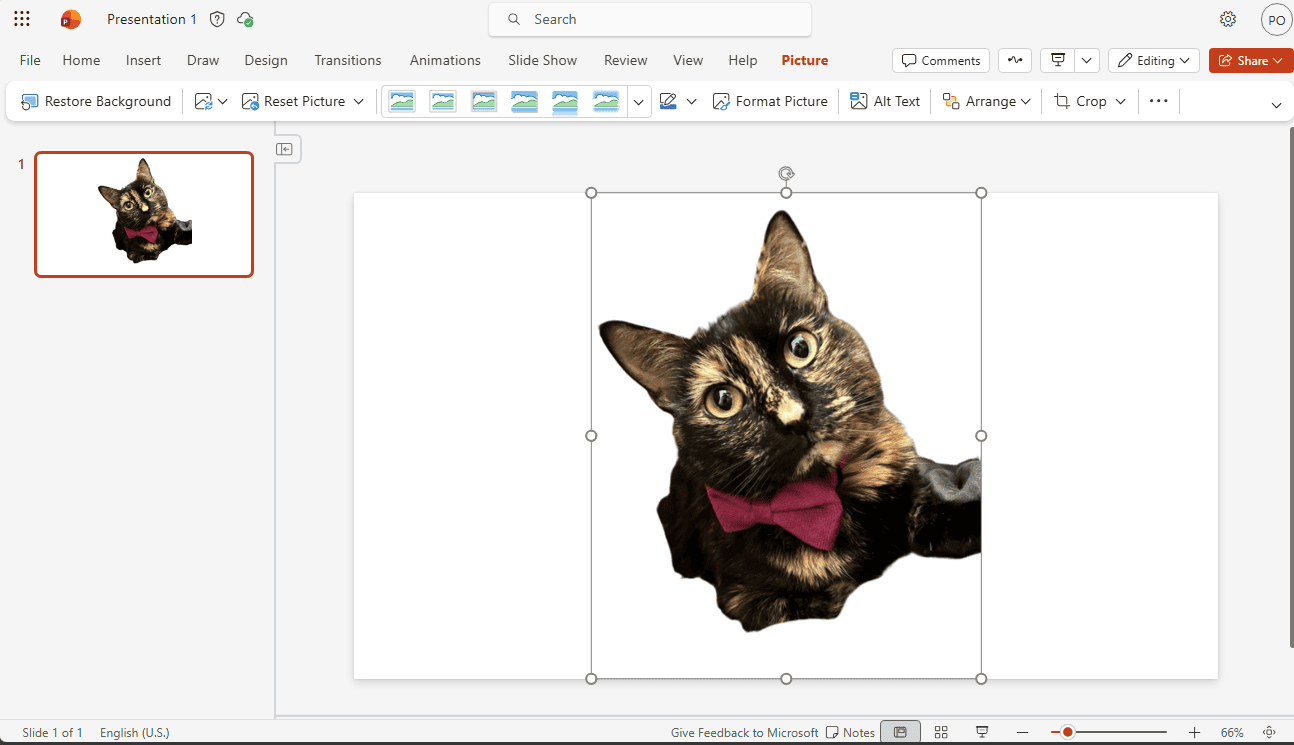
After clicking Remove Background, PowerPoint highlights the background in magenta. From there, you can refine your selection using the Mark Areas to Keep or Mark Areas to Remove.
If the button still doesn’t appear, it’s often because the user has selected an unsupported object, such as an icon or SVG. Microsoft Support clarifies that the tool only works on standard bitmap images (JPG, PNG). Another common mistake is clicking Format Background (for slide backgrounds) instead of Remove Background.
How to Remove the Background From an Image in PowerPoint (Desktop Tutorial)
If you want a clean, transparent cutout without leaving PowerPoint, the built-in tool offers a straightforward workflow. These steps follow the exact process used on Windows and Mac, directly answering the common user question: How do I remove the background from an image? They provide a clear walkthrough for anyone learning how to remove picture background in PowerPoint for the first time.
Step-by-Step: How to Remove Background in PowerPoint
- Select your image: Start by clicking the picture on your slide or insert a new one using Insert →Pictures. PowerPoint must detect the file as a bitmap image for the background removal options to appear.
- Access the Remove Background tool: With your image selected, PowerPoint automatically reveals the Picture Format tab. In the Adjust group, choose Remove Background to activate the removal workspace.
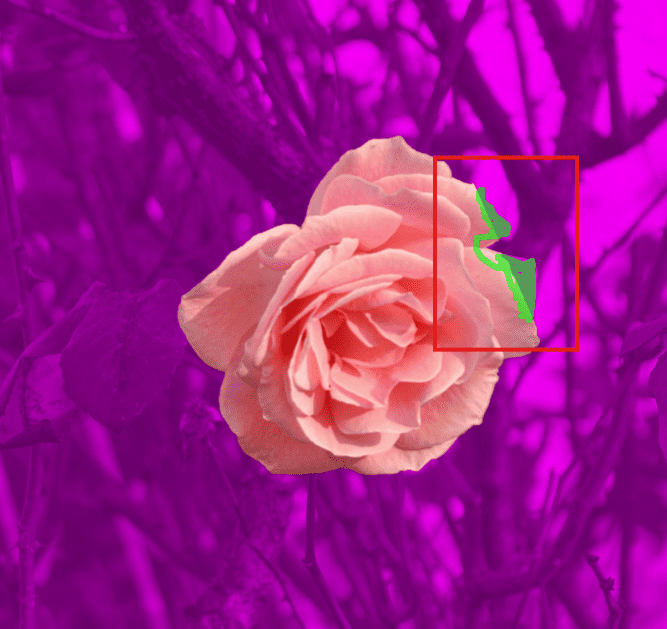
Review the automatic selection: PowerPoint instantly analyzes the image and adds a magenta preview over everything it believes is background. Anything left in its original color is treated as the subject to keep. This preview is only temporary until you confirm your changes.

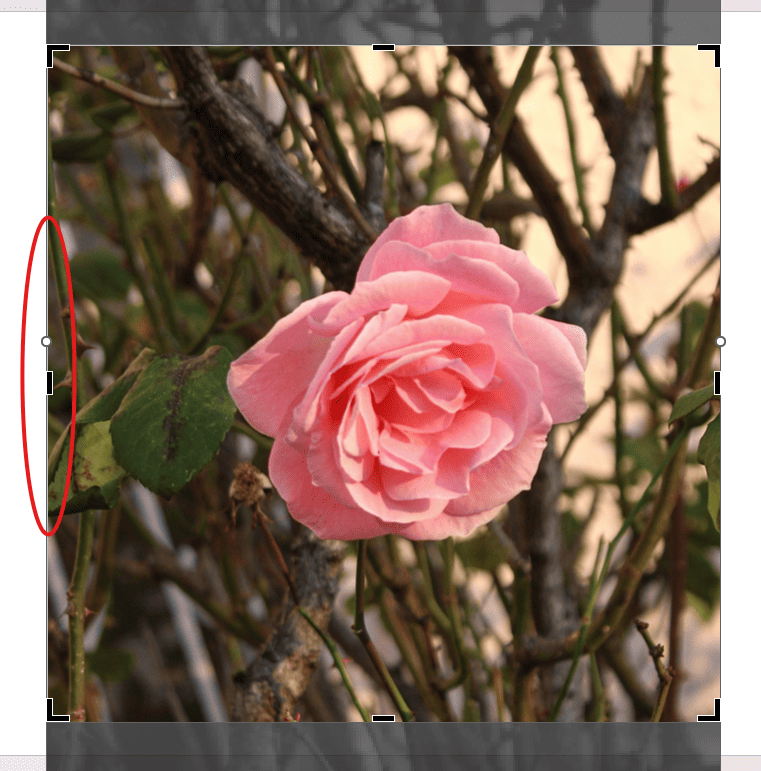
Adjust the selection box: Drag the bounding box so it closely frames the subject. A tighter box helps the algorithm find cleaner edges and reduces later cleanup.
How to Use “Mark Areas to Keep” and “Mark Areas to Remove”
Once PowerPoint creates its initial mask, you gain access to the refinement tools that allow full manual control.
Guiding PowerPoint’s decisions
- Use Mark Areas to Keep when important parts of your subject are mistakenly colored magenta. These strokes tell PowerPoint which pixels you want preserved.
- Use Mark Areas to Remove on areas that remain in full color but should be treated as background.
Each click or drag adjusts the underlying segmentation, and PowerPoint recalculates the mask in real time. These tools make the feature flexible enough to handle uneven lighting, fine details, or images with overlapping colors.
How to Refine Edges for Better Accuracy
When you are working with complex images, the key to a clean final cutout lies in edge refinement. Even users familiar with how to remove the background from an image in PowerPoint often overlook this small but essential step.
- Improve precision with careful framing
A precisely adjusted selection box gives PowerPoint a clearer context, helping it separate foreground from background more accurately.
- Use small, controlled strokes
Short strokes with Mark Areas to Keep and Mark Areas to Remove are more effective than long drawn lines. They guide the tool around hairlines, object outlines, and subtle curves where the magenta mask often struggles.
- Zoom in for delicate areas
Zooming in before refining edges can dramatically increase precision. It allows you to place marks exactly where they are needed without overcorrecting the mask.
- Evaluate your subject’s contrast
If the subject blends into the background, expect more manual work. Low-contrast edges tend to mislead PowerPoint’s segmentation, making careful refinement essential.
Mastering these refinements is part of the essential toolkit for any presenter; if you’re just getting started with the platform, our PowerPoint 101 guide covers all the ribbon basics you’ll need.

How to Reset or Undo Background Removal
Sometimes the selection becomes too messy, or too many refinements make the cutout worse instead of better. PowerPoint makes it easy to start over.
When to reset
You should reset when:
- Large parts of your subject keep turning magenta
- The background will not disappear despite multiple adjustments
- The selection box was poorly framed from the start
- You want to try the How to remove background of an image in PowerPoint workflow again from scratch
How to undo
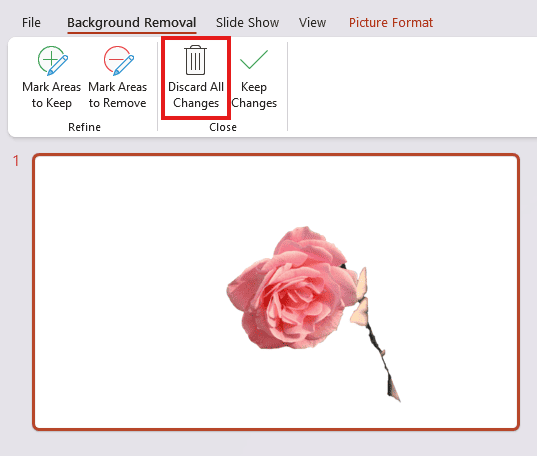
Click "Discard All Changes" or press Escape to return the picture to its original state. You can also delete the edited image and reinsert a fresh copy if you want a clean beginning.
Resetting is often the fastest way forward when the segmentation becomes overly fragmented or when the image is naturally difficult for PowerPoint’s tool to interpret.
How PowerPoint Detects and Removes Backgrounds Automatically
Microsoft’s PowerPoint background removal is powered by automatic image segmentation. It studies edges, contrast, and color transitions to figure out where the subject ends and the background begins. This is why the tool performs best when the image has a clear separation between object and surroundings.
If you’ve ever wondered, “How do I remove the background from an image?” or why some photos cooperate more than others, the reason is that it tends to work best on images where the subject stands out clearly from the background.
When the initial cutout isn’t accurate enough, PowerPoint allows you to refine it using Mark Areas to Keep and Mark Areas to Remove, providing manual control over challenging regions. As Microsoft Support explains, these tools enable you to guide the algorithm in refining the background removal manually, resulting in a cleaner and more precise final image.
When you activate Remove Background, PowerPoint immediately analyzes the image and places a magenta overlay on everything it identifies as the background. The uncolored areas are treated as the subject. It’s important to remember that this is only a preview; PowerPoint won’t delete anything until you approve the selection. This overlay is simply showing what will become transparent if you choose to remove the background in PowerPoint.

Why Does PowerPoint Sometimes Fail to Detect the Background Correctly?
PowerPoint’s background removal works by analyzing edges, contrast, and color differences to decide what belongs to the subject and what should be removed. But this process isn’t perfect. According to Microsoft Support, the tool struggles whenever these visual cues are weak, so even if you understand the basic steps to remove background from an image in PowerPoint, the results can still look off on complex photos."
When the tool misreads the image, parts of the subject turn magenta, while other parts of the background remain untouched. This usually means the automatic segmentation failed, and you’ll need to guide it with Mark Areas to Keep or Mark Areas to Remove, a normal part of how to remove the background of a picture in PowerPoint when the image is complex.
PowerPoint tends to struggle in a few predictable scenarios:
- Dark or low-contrast images: If the subject and background share similar tones (like dark clothes on a dark wall), the algorithm can’t find clean edges.

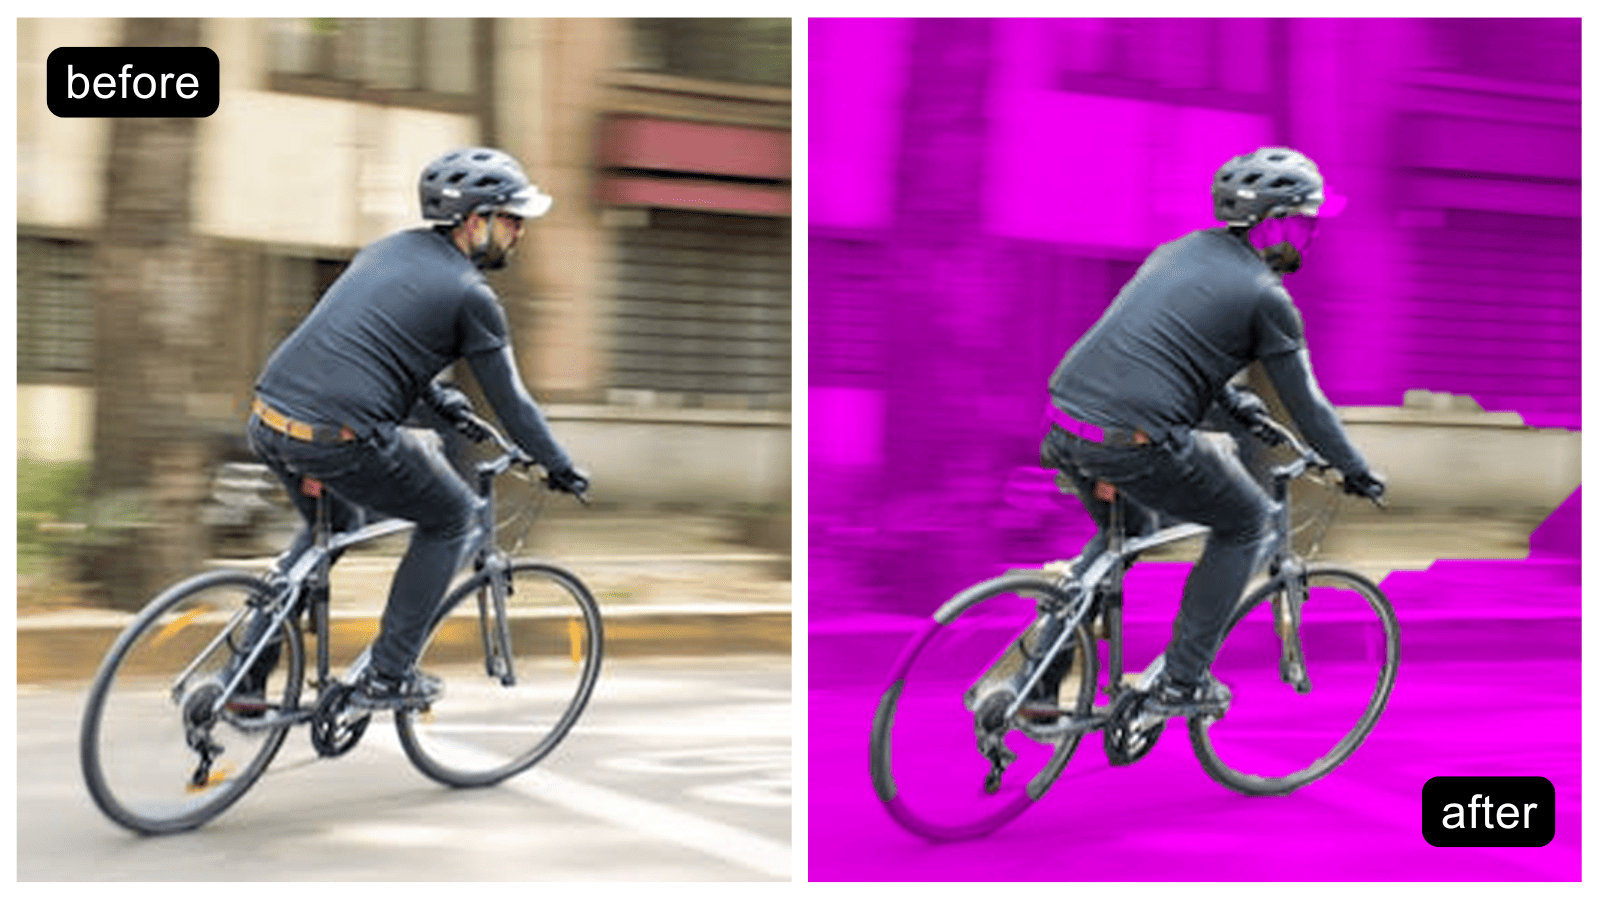
- Busy or textured backgrounds: Photos filled with foliage, patterns, or heavy detail overwhelm the segmentation process; this is why random magenta patches appear across both the subject and the background.

- Soft or fuzzy edges: Hair, fur, smoke, and motion blur don’t have crisp outlines. PowerPoint often trims away delicate fine edges, even if you're experienced with how to remove a background in PowerPoint.
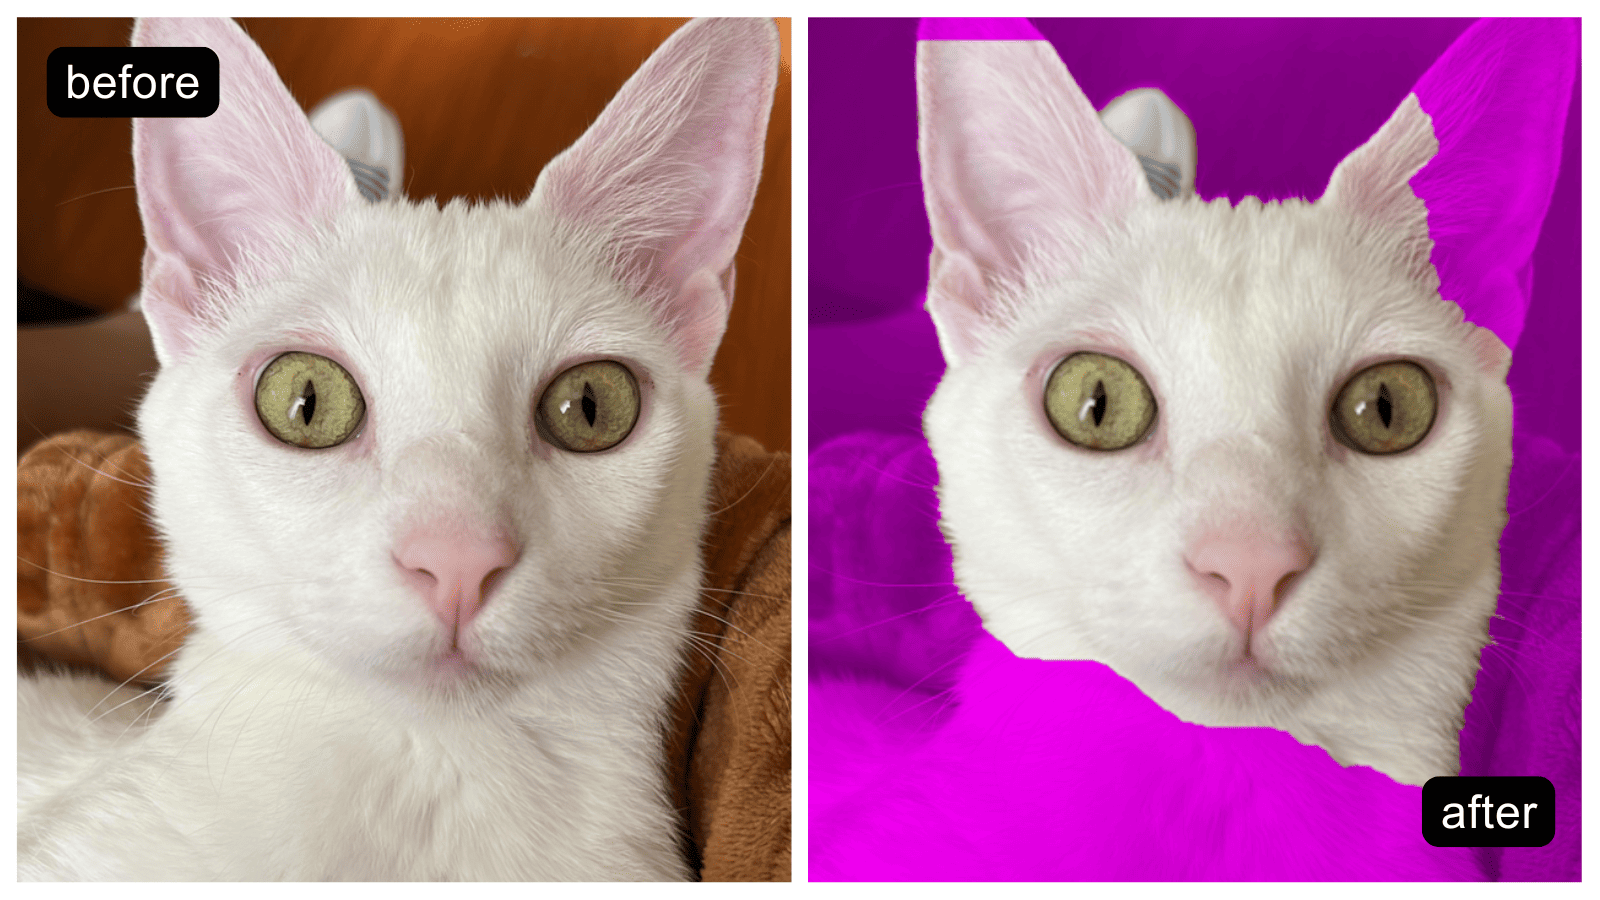
- Similar colors between the subject and the background: When colors blend together, PowerPoint sees the two areas as a single shape.

- Low-resolution or compressed images: Blurry or pixelated edges give the tool less information to work with. BrightCarbon notes that this increases the chance of missing important details.
When this happens, the best path forward is to refine the selection manually or, for very challenging photos, preprocess the image with a dedicated background remover before reinserting it into PowerPoint.
Limitations of PowerPoint’s Background Removal Tool
Even though PowerPoint’s Remove Background tool is a convenient way to handle quick cutouts, it comes with real constraints that affect accuracy, speed, and image quality across platforms.
Real-world takeaway
Based on both our testing and external documentation:
PowerPoint Online should be considered unreliable for background removal and entirely unavailable for free users.
If you want consistent results for removing background in PowerPoint, you must download your file and continue editing in the Desktop version.
Troubleshooting: What to Do When PowerPoint Doesn’t Remove the Background Correctly
Even though PowerPoint’s Remove Background tool is designed to be quick and accessible, it often struggles with real-world images. Microsoft notes that the automatic detection can fail or require heavy manual input when edges are unclear or the background is visually complex
This section helps you fix the most common issues users face when trying to remove the background in PowerPoint or when the tool does not behave as expected.
If you have ever wondered, “How do I remove the background from an image?”, when the auto-detection fails, these targeted troubleshooting steps will help you get better, cleaner results.
Fixing Low Contrast or Busy Background Issues
Low contrast is one of the most common reasons PowerPoint misidentifies the subject and background. When the tones are similar, the magenta mask becomes inaccurate, leaving large areas unselected or incorrectly removed. Busy or patterned backgrounds create another challenge. The algorithm sees too many competing edges and produces an incomplete or fragmented selection.
Here is a reliable workflow to improve results:
Step 1: Improve contrast before clicking Remove Background
Go to Picture Format → Corrections and slightly increase brightness and contrast. A boost of ten to thirty percent often helps define the subject’s edges more clearly.

Step 2: Tighten the selection frame
After selecting the image and choosing 'Remove Background', drag the bounding rectangle so that it hugs the subject closely. This limits the area PowerPoint analyzes and reduces confusion from busy surroundings.
Step 3. Refine with manual strokes
Zoom to two hundred percent or more and use:
- Mark Areas to Keep for details, PowerPoint removed
- Mark Areas to Remove for leftover background

Pro tip
If the image is extremely cluttered, crop it first, then run the removal tool. This reduces the amount of competing visual information.
If you find that a busy background is too difficult to remove entirely without looking pixelated, you might consider fading the image instead. Find out how to make a picture transparent in PowerPoint to create a more subtle, professional overlay.
Removing Leftover Artifacts or Edges
Even when the background is technically removed, faint halos or pixel noise may remain. This is normal because PowerPoint does not use feathering or subpixel smoothing
Option 1. Second-pass cleanup
Re-enter Remove Background, zoom in, and use Mark Areas to Remove on:
- Thin white halos
- Shadow fragments
- Leftover specks in corners
This works best when the image edges are well defined.
Option 2. Masking with shapes
For stubborn artifacts:
- Insert a rectangle or oval
- Set no fill and a white outline
- Send it behind the subject
- Group the shape with the image
This visually hides imperfections without affecting the actual cutout.
Option 3. Export for inspection
Right-click → Save as Picture → PNG. PNG transparency often reveals subtle edges that are harder to see against the slide background.
Once you've mastered image editing, you can further streamline your entire design process with these 45 tips to speed up your PowerPoint design workflow.
When PowerPoint Should Not Be Used for Background Removal
PowerPoint is convenient, but it has clear limitations. It is not ideal for images requiring precise, professional-level cutouts.
Avoid using PowerPoint for background removal when working with:
- Fine hair or fur
- Transparent or semi-transparent objects such as glass
- Low-light photos with soft edges
- Product photography where perfection is required
High-resolution or complex images that exceed what the algorithm can interpret
The tool’s segmentation engine works well for quick slide edits but caps out at “good enough,” rather than achieving pixel-perfect precision. In these situations, dedicated tools such as remove.bg, Photoshop, or Illustrator create far cleaner results with far less effort.
If the goal is a polished asset rather than a quick slide, switching tools saves time and significantly improves quality. Removing a background is just the first step in creating a great visual; for more inspiration on choosing the right textures and colors for your slides, check out our top ideas for creating the best PowerPoint presentation background.
Differences Between PowerPoint Online vs Desktop, vs Mobile
Because the mobile and online versions have limitations, the most reliable way to powerpoint remove background from image is to use the full feature set available on the desktop app.
According to Microsoft’s feature comparison page, the desktop app includes the complete AI-based segmentation engine, the magenta overlay, the manual refinement tools, and transparency-preserving export options. PowerPoint Online and Mobile, on the other hand, offer significantly reduced versions of the workflow. Both platforms are designed for speed and collaboration rather than pixel-level image editing, which results in lower detection accuracy and missing refinement tools.
At a glance
- Desktop: The desktop application remains the superior choice for PowerPoint picture background removal because it provides the full suite of manual refinement tools.

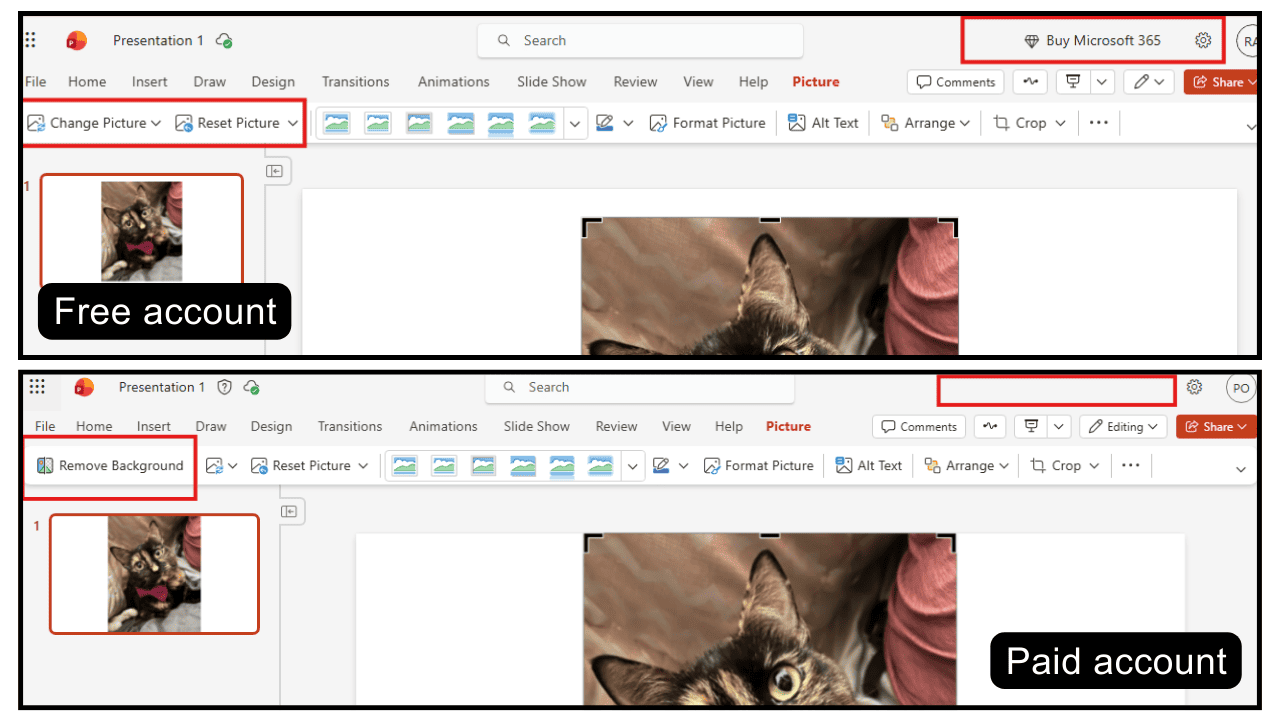
- Online: Without a paid Microsoft 365 account, the 'Remove Background' button is unavailable, and images are often rasterized, significantly limiting your editing precision and final quality. Additionally, the manual refinement tools found in the desktop app, such as 'Mark Areas to Keep', are not available in the online version, meaning that any automatic errors cannot be corrected. For these reasons, we do not recommend using PowerPoint Online to remove backgrounds from complex or difficult images due to its limited processing capacity.
- Mobile: The background removal tool is not included in the basic mobile PowerPoint app.
This is why creators who need precise cutouts, especially when following tutorials that reference remove background in PowerPoint, consistently get the best results on desktop.
How to Remove Background in PowerPoint Online
Many users searching for how to remove picture background in PowerPoint online hope to edit images directly in their browser while collaborating in real-time. However, after testing multiple browsers, devices, and both free and paid Microsoft accounts, the reality is clear: PowerPoint Online offers only limited background-removal capabilities, and for most users, the full feature simply does not exist.
What PowerPoint Online can do
Depending on your account type:
- It may offer Set Transparent Color, a very basic tool that only works when the background is a solid, uniform color.
- This option appears more often on paid Microsoft 365 web accounts, but is frequently missing in free accounts.
What PowerPoint Online cannot do
In both our testing and across user reports, PowerPoint Online does not support:
- The magenta preview mask used by Desktop
- Mark Areas to Keep or Mark Areas to Remove
- Any meaningful edge refinement
- High-accuracy detection or segmentation
- True transparency that exports cleanly
Why results vary by account type
Paid Microsoft 365 web accounts sometimes display a simplified Remove Background button. Free accounts do not show it at all.
However, even when the button appears:
- It does not include the magenta overlay
- It does not allow marking areas manually
- It cannot match the accuracy of the desktop version
So while the feature may technically “exist” in paid accounts, it does not function like the true Remove Background tool.
What this means for users
Because of the limited capabilities, anyone searching how to remove background of image in PowerPoint in the online version will almost always need to switch to the Desktop app for clean, professional results.
Online is excellent for collaboration, but it is inadequate for background removal.
Is Background Removal Available on Mobile?
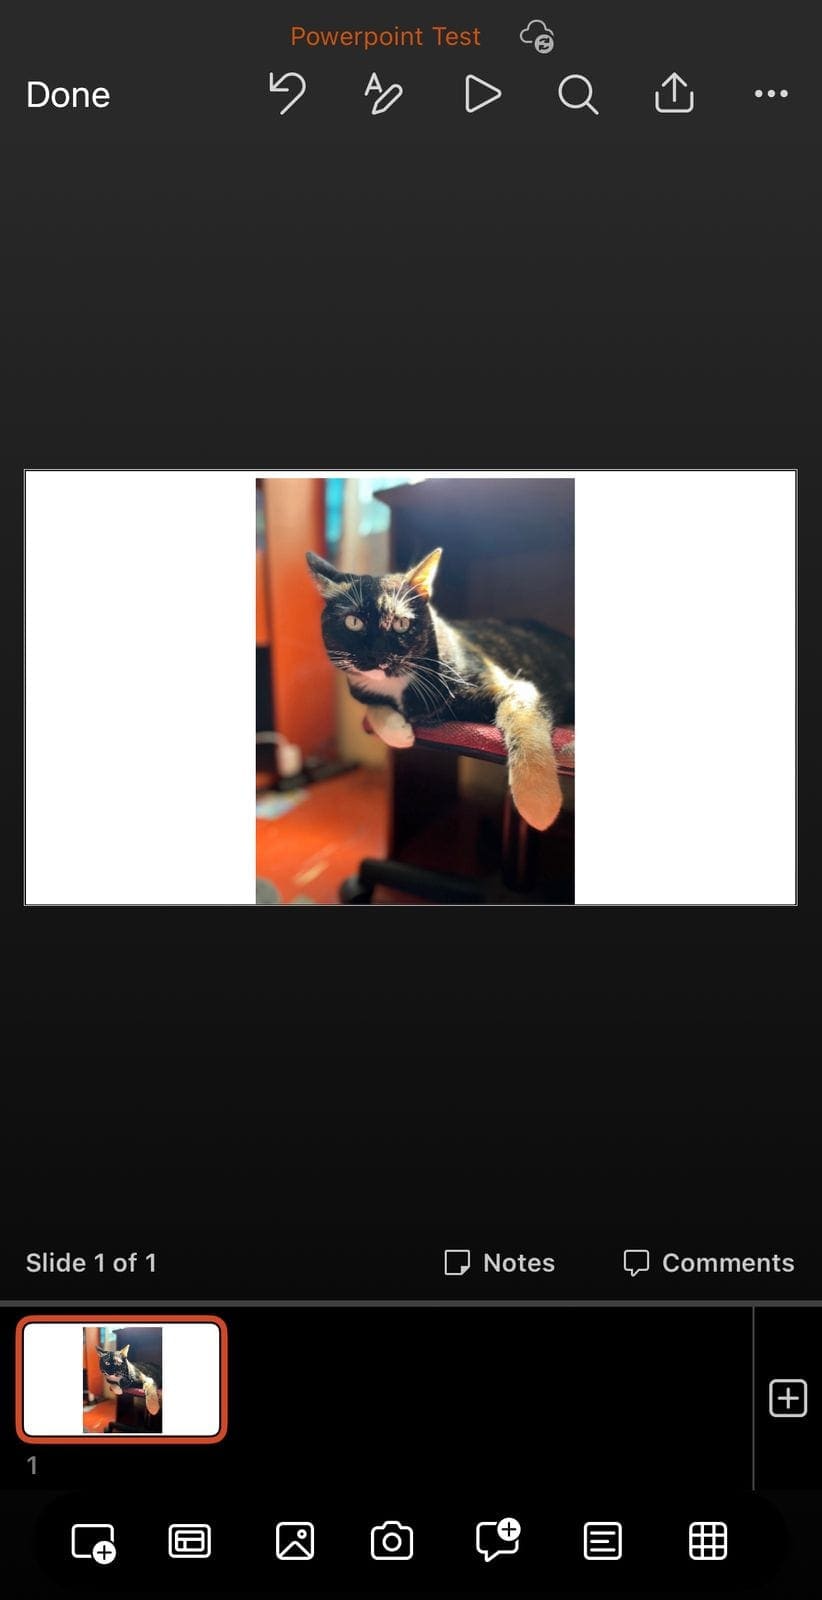
After testing the current PowerPoint apps on iOS and Android, if you are searching for how to remove background in PowerPoint mobile, the answer is clear: the specific 'Remove Background' tool does not currently exist in the mobile apps for iOS or Android. Although some older tutorials suggest otherwise, neither platform displays a 'Remove Background' button when selecting an image, and there are no refinement tools or transparency options.
The mobile builds lack advanced image editing features entirely. Some AI detection elements available on desktop are intentionally removed, as mobile PowerPoint focuses on quick edits and presentation playback rather than pixel-level editing.
What this means for users
- There is no way to use Remove Background on iOS or Android
- There is no Set Transparent Color option
- There are no refinement tools, such as Mark Areas to Keep or Remove
- Mobile PowerPoint treats images as static objects with minimal formatting options
These findings explain why users searching for how to remove background from image in PowerPoint or how to remove background of a picture in PowerPoint consistently end up needing the desktop version to complete the process.
Recommended workflow for mobile users
Since mobile lacks all background removal capabilities, the best practice is:
The most efficient workflow is to learn how to use remove background in PowerPoint on your desktop first, then save the result as a transparent PNG for use on other devices.
Mobile is best reserved for quick, simple edits. If your goal is precise results for terms like how to remove image background in PowerPoint preprocessing the image on a desktop and saving it as a transparent PNG before inserting it into a mobile file.
Let Experts Clean Up Your Images and Elevate Your Slides
If you’ve reached the limits of PowerPoint’s Remove Background tool, or you simply want a cleaner, more professional result, our designers can take your slide far beyond what auto-detection can do. At 24Slides, we don’t just remove backgrounds; we transform your entire presentation into a polished, on-brand visual story.
What can we help you with?
✔ Flawless background cleanup and image refinement
✔ Custom presentation design
✔ Branded PowerPoint master templates
✔ Infographics & custom illustrations
✔ Social media visuals
✔ Word & Excel document design
With over 12 years of presentation design expertise and clients in 74+ countries, our team has delivered more than 325,624 hours of time saved to professionals who no longer struggle with manual fixes, such as removing backgrounds from images in PowerPoint.
Try the 24Slides difference for just $1.
Submit one slide, even one you’re stuck cleaning up, and our designers will return a fully custom, editable, on-brand version.
It’s a $43 value, offered to you for only $1, so you can experience the power of professional design with zero risk.

Transform your slide for $1 and see how much better your presentation can look.
If you have any questions, our Customer Support team is here to help. Don’t let small doubts or tricky background removals hold back your best presentation yet.
Want to make better PowerPoint slides? Read this!